Weaf HR

Recruitment and Onboarding

Recruitment runs end to end here: you describe the job, publish it, collect candidates, interview them, record what the interviewers thought, make an offer, and onboard whoever accepts.

Recruitment runs end to end here: you describe the job, publish it, collect candidates, interview them, record what the interviewers thought, make an offer, and onboard whoever accepts.

The first four pages in this chapter are reference lists. They feel like a detour, but they are what lets a posting be created in a minute rather than retyped each time.

Pages in this chapter
  • Job Categories
  • Job Types
  • Job Locations
  • Custom Questions
  • Job Postings
  • careers
  • Candidate Sources
  • Candidates
  • Interview Types
  • Interview Rounds
  • Interviews
  • Interview Feedback
  • Candidate Assessments
  • Offer Templates
  • Offers
  • Onboarding Checklists
  • Checklist Items
  • Candidate Onboarding

Job Categories

A reference list. Entries created here become the options offered when you create a job posting. Setting these up once, before the records that use them, saves correcting the same choice repeatedly later.
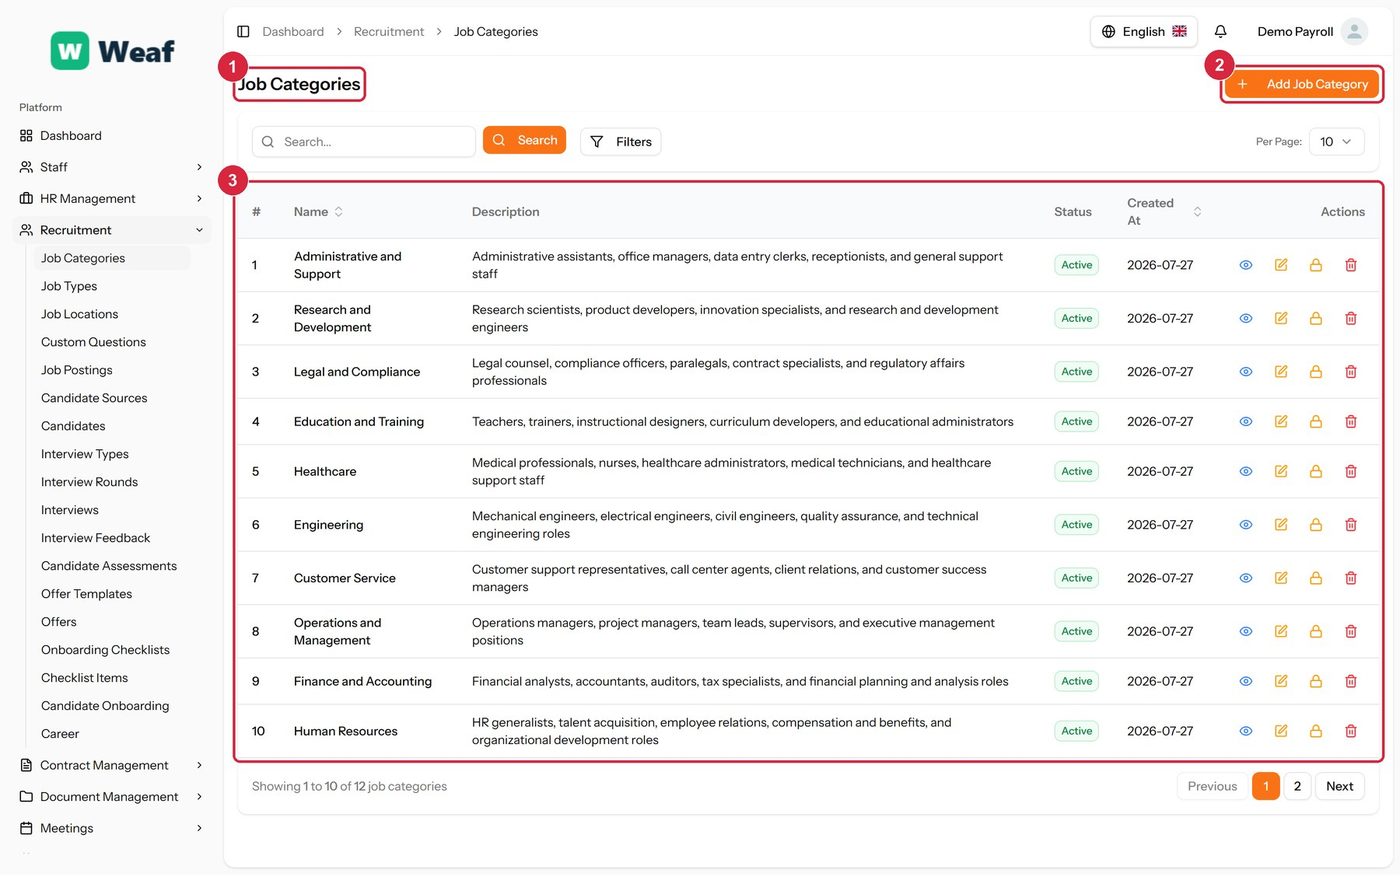
The Job Categories page
  • 1 page title
  • 2 primary action
  • 3 records table
Columns
  • #
  • Name
  • Description
  • Status
  • Created At
  • Actions
Actions on this page
  • Add Job Category
  1. Choose Add Job Category at the top right. The form opens in a panel.
  2. Complete the required fields: Name.
  3. Fill in anything else that applies: Description.
  4. Make the selections the form asks for: Status.
  5. Choose Save. The new record appears in the list.
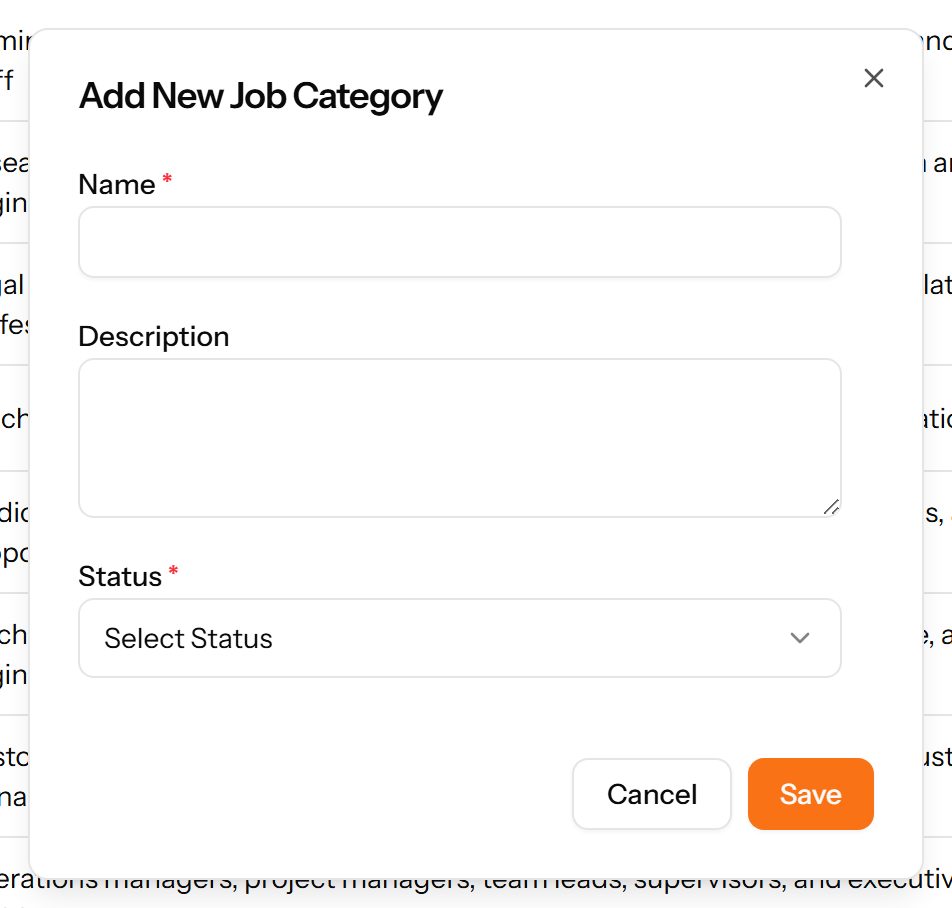
The Add Job Category form

Job Types

A reference list. Entries created here become the options offered when you create a job posting. Setting these up once, before the records that use them, saves correcting the same choice repeatedly later.
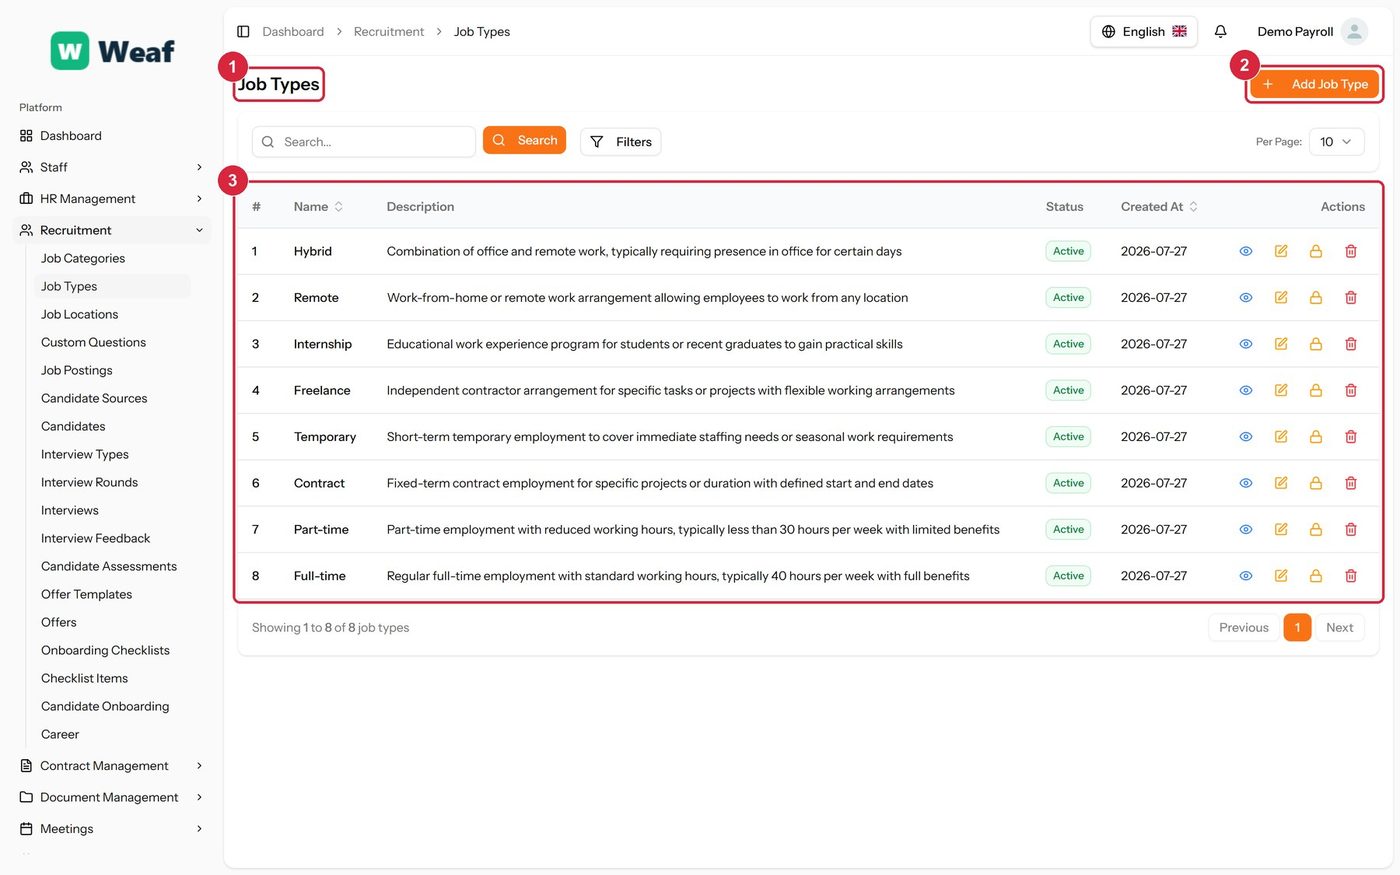
The Job Types page
The Job Types page
  • 1 page title
  • 2 primary action
  • 3 records table
Columns
  • #
  • Name
  • Description
  • Status
  • Created At
  • Actions
Actions on this page
  • Add Job Type
  1. Choose Add Job Type at the top right. The form opens in a panel.
  2. Complete the required fields: Name.
  3. Fill in anything else that applies: Description.
  4. Make the selections the form asks for: Status.
  5. Choose Save. The new record appears in the list.
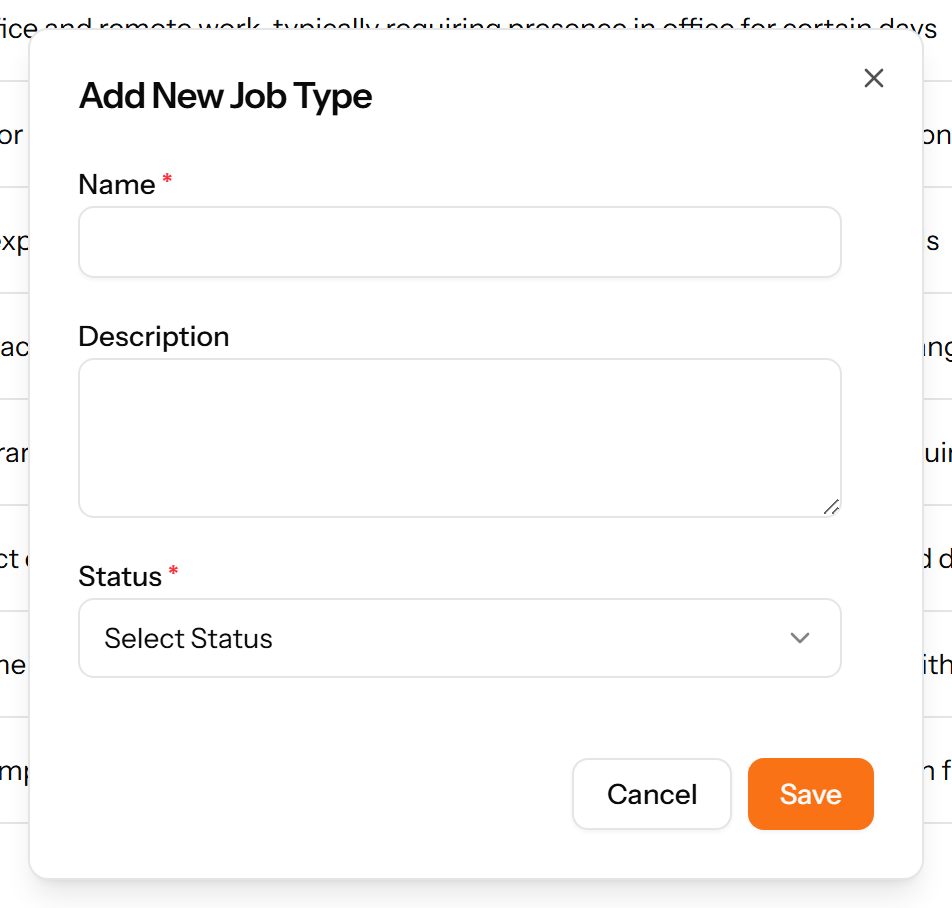
The Add Job Type form

Job Locations

Where a job is based. Locations are reusable across postings and carry an address and a type, such as on-site or remote.
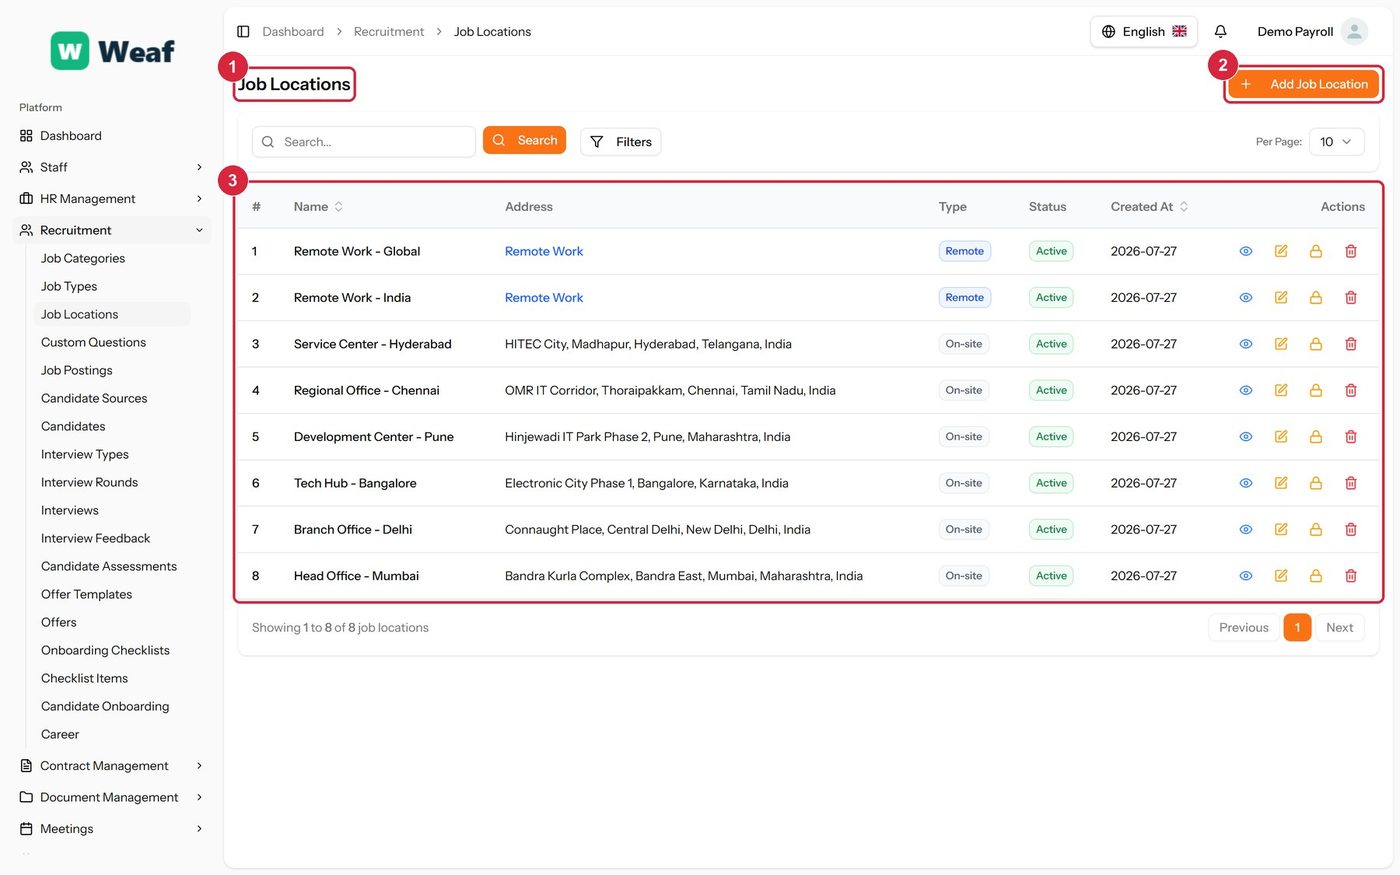
The Job Locations page
  • 1 page title
  • 2 primary action
  • 3 records table
Columns
  • #
  • Name
  • Address
  • Type
  • Status
  • Created At
  • Actions
Actions on this page
  • Add Job Location
  1. Choose Add Job Location at the top right. The form opens in a panel.
  2. Complete the required fields: Name.
  3. Fill in anything else that applies: Remote Work, Address, City, State, Country, Postal Code.
  4. Make the selections the form asks for: Status.
  5. Choose Save. The new record appears in the list.
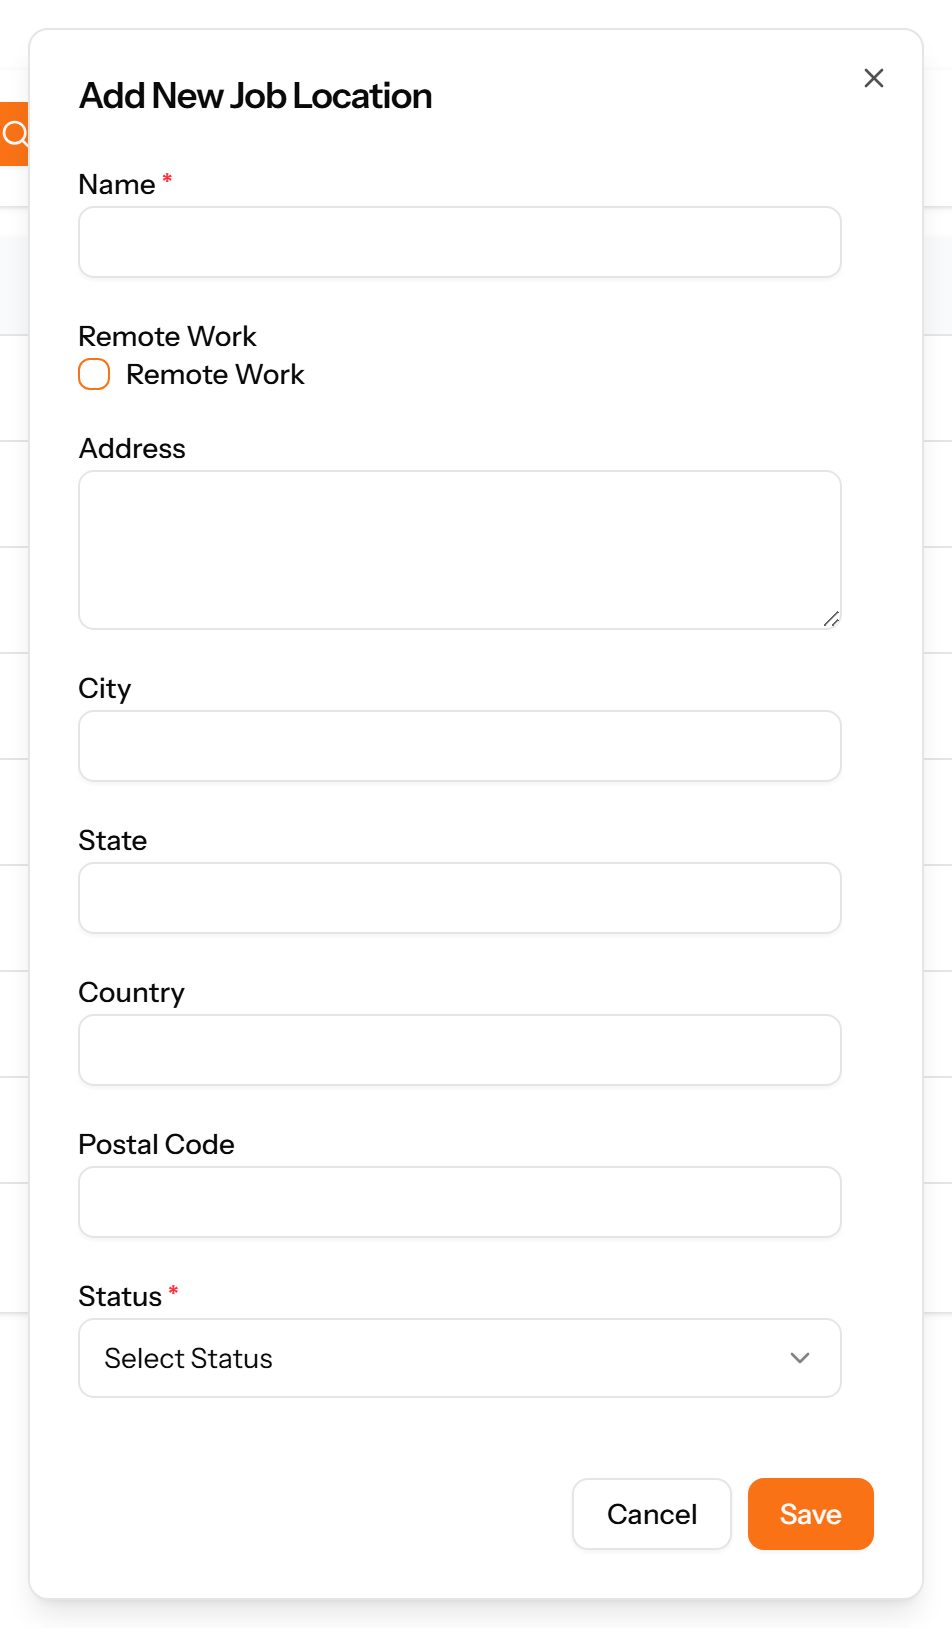
The Add Job Location form

Custom Questions

Extra questions added to the application form, for information a CV does not reliably provide.
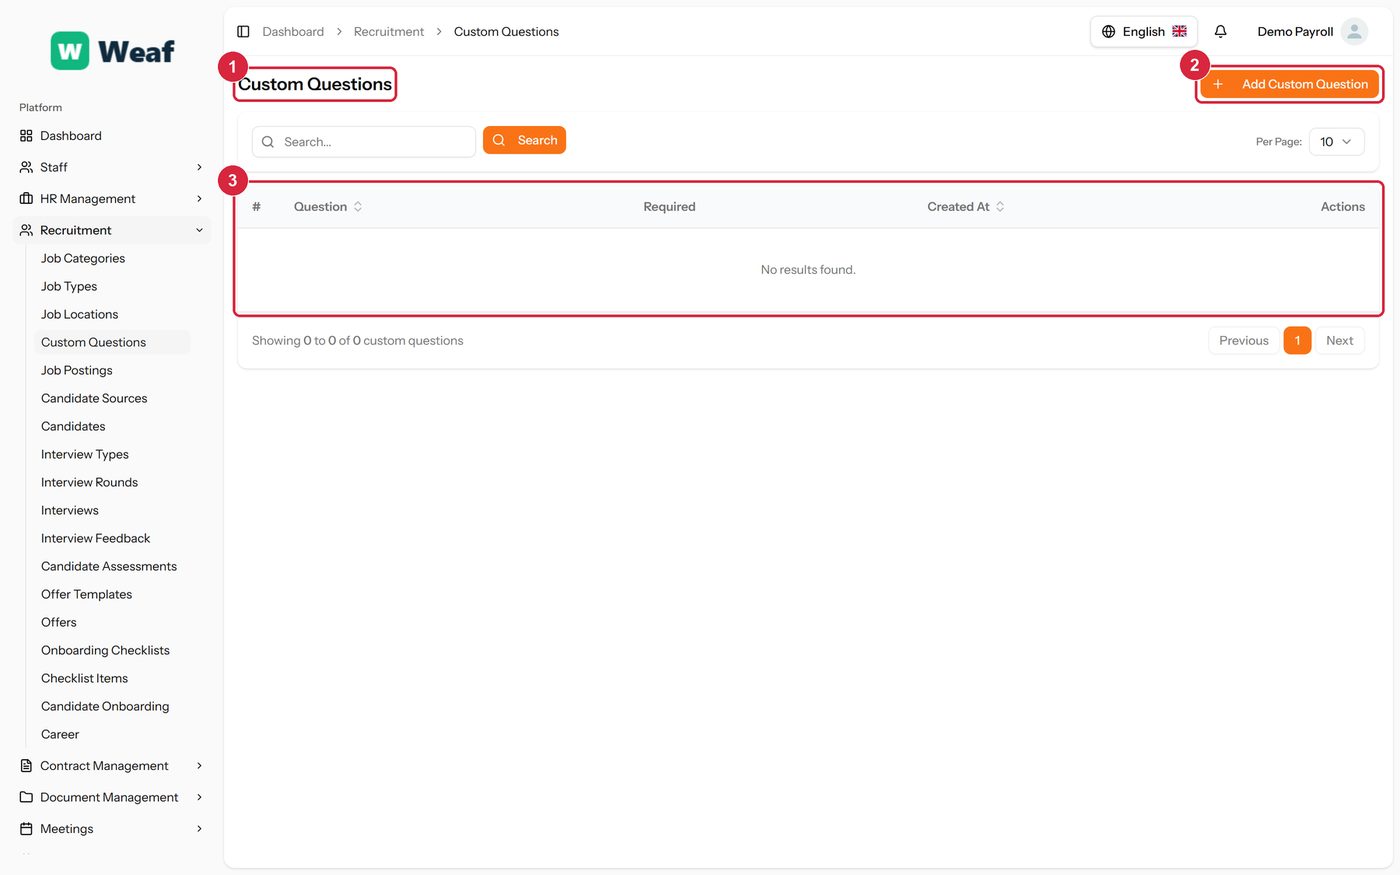
The Custom Questions page
  • 1 page title
  • 2 primary action
  • 3 records table
Columns
  • #
  • Question
  • Required
  • Created At
  • Actions
Actions on this page
  • Add Custom Question
  1. Choose Add Custom Question at the top right. The form opens in a panel.
  2. Complete the required fields: Question.
  3. Choose Save. The new record appears in the list.
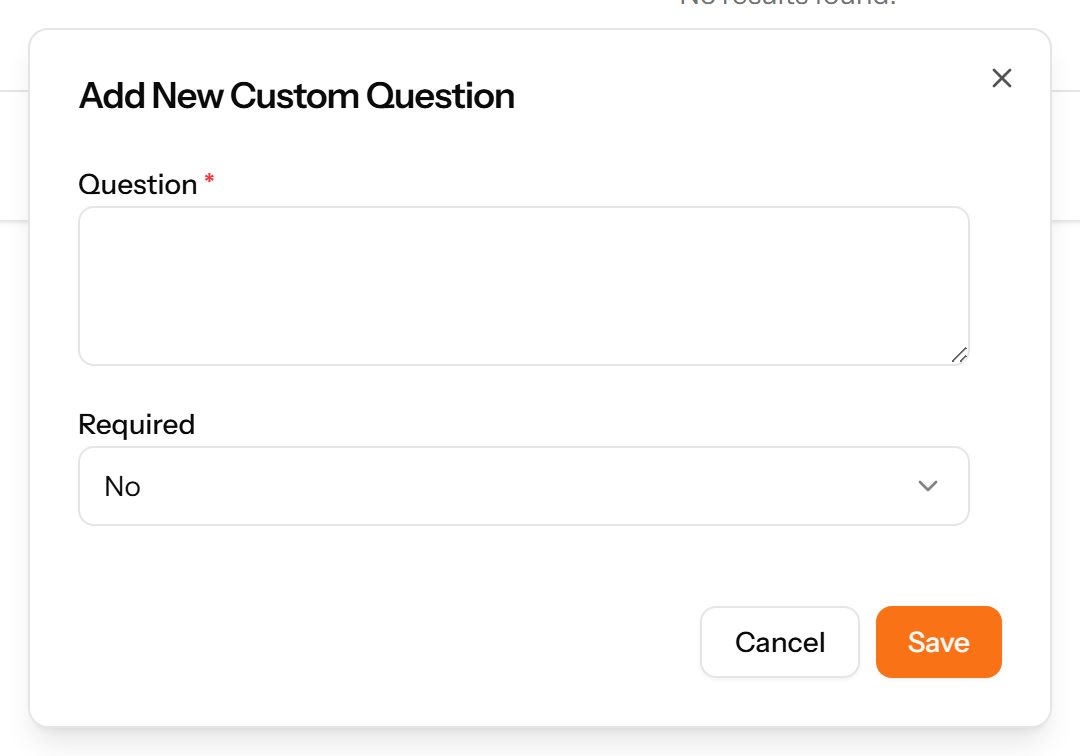
The Add Custom Question form

Job Postings

The vacancies themselves. A posting carries a code, a title, a type, a location and a salary range, and collects the applications made against it. Published postings appear on the public careers page.
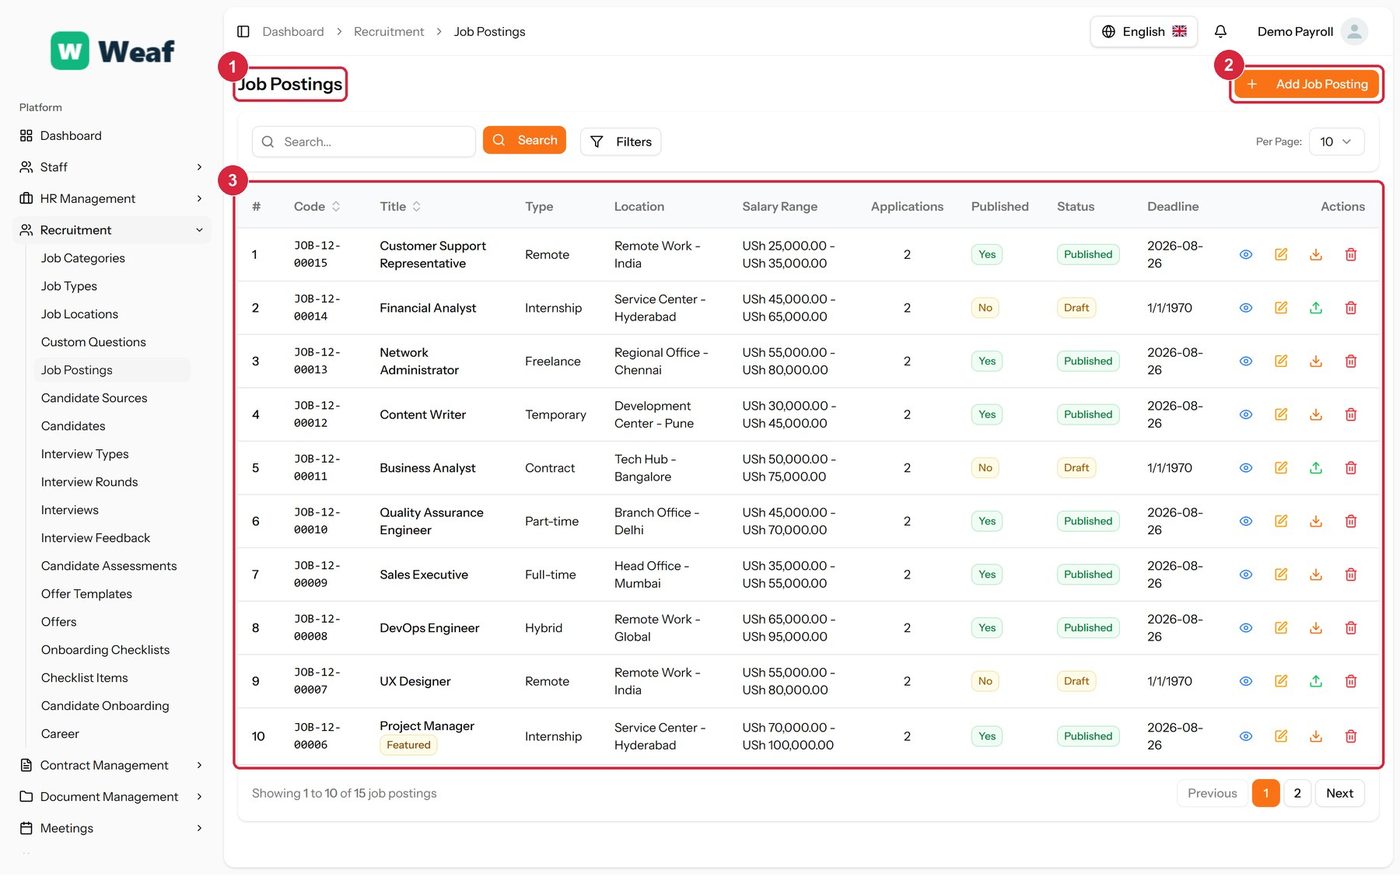
The Job Postings page
  • 1 page title
  • 2 primary action
  • 3 records table
Columns
  • #
  • Code
  • Title
  • Type
  • Location
  • Salary Range
  • Applications
  • Published
  • Status
  • Deadline
  • Actions
Actions on this page
  • Add Job Posting
  1. Choose Add Job Posting at the top right. The form opens on its own page.
  2. Complete the required fields: Job Title, Start Date, Application Deadline, Application URL, Number of Positions, Min Experience (Years), Max Experience (Years), Min Salary, Max Salary.
  3. Fill in anything else that applies: Type Required Skills and press Enter, Featured Job, Gender, Date Of Birth, Cover Letter, Terms And Conditions.
  4. Make the selections the form asks for: Job Type, Location, Branch, Department.
  5. Choose Save. The new record appears in the list.
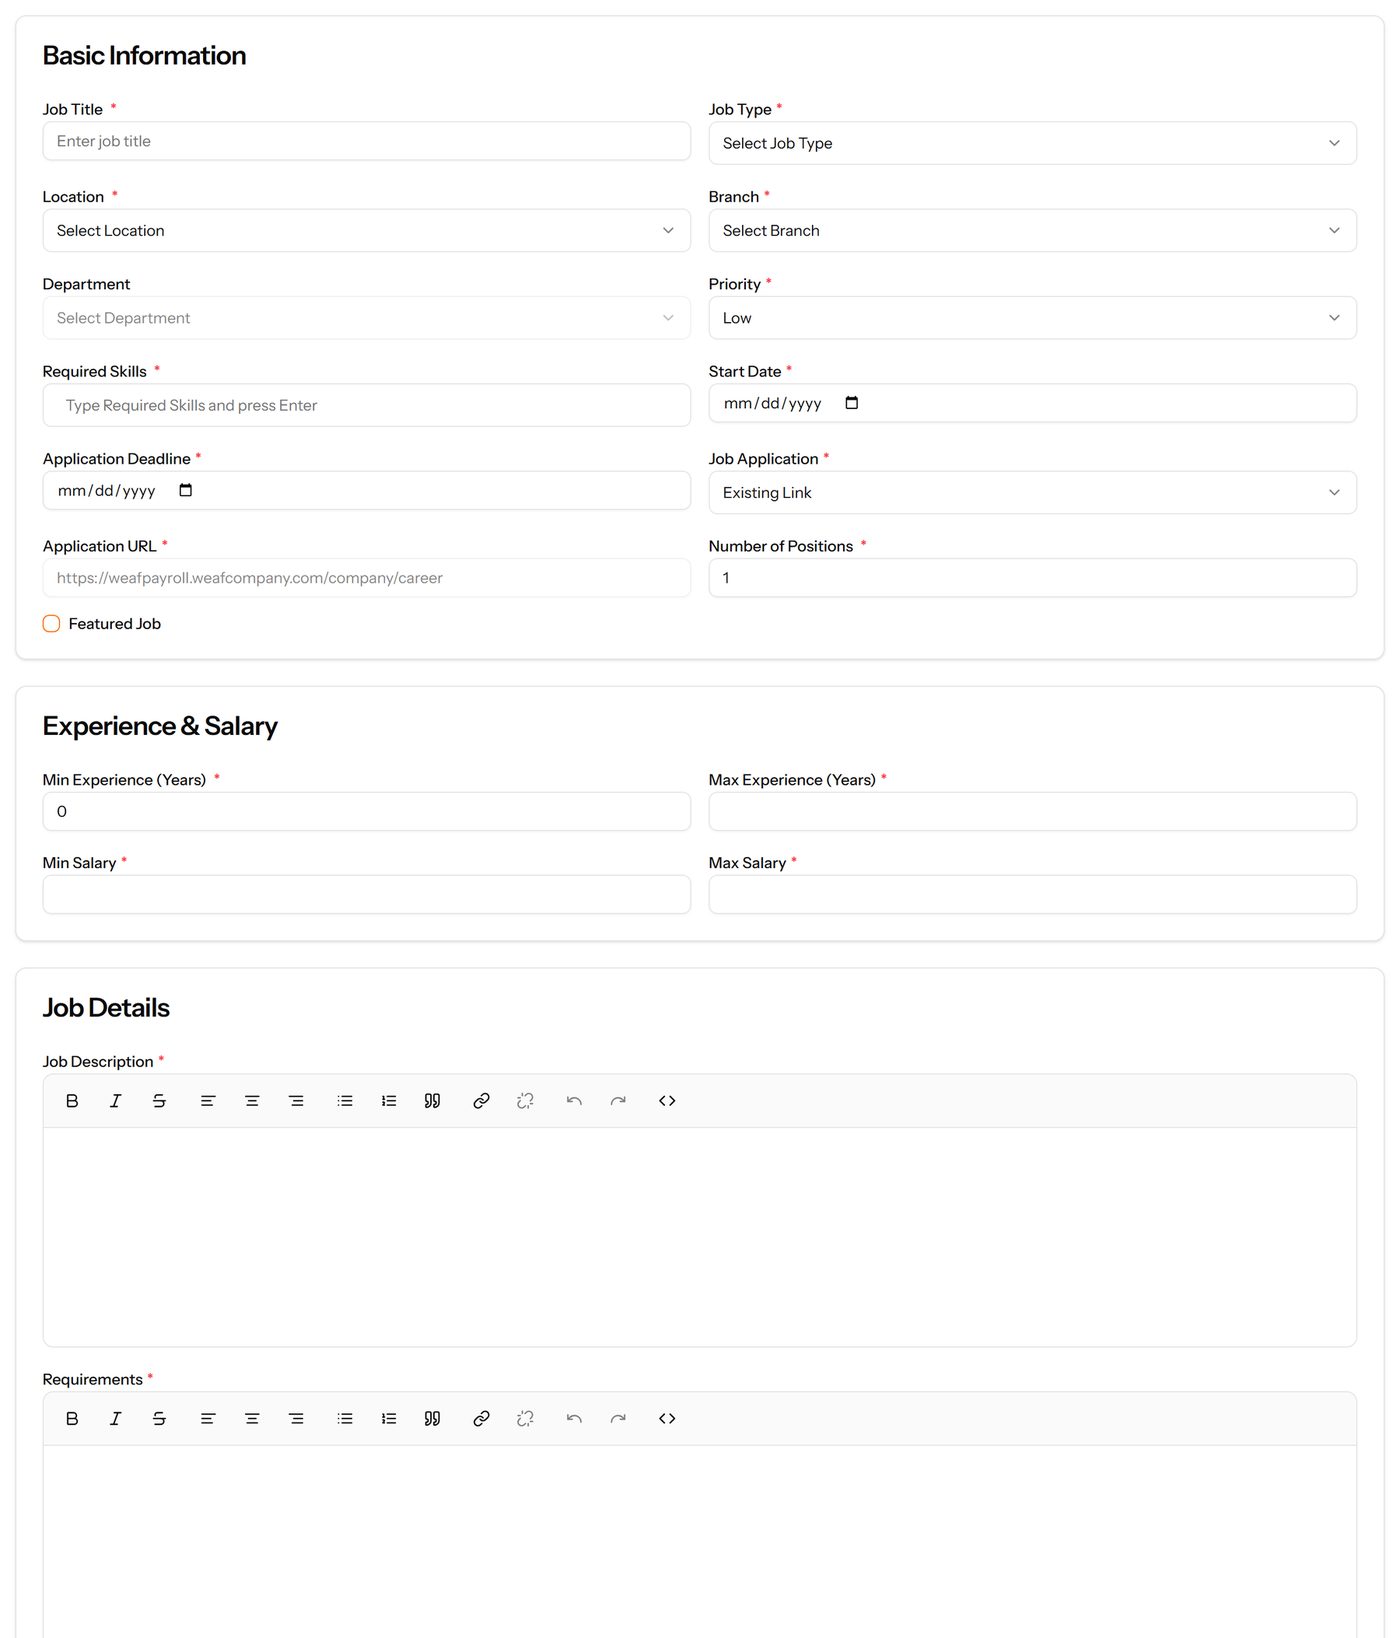
The Add Job Posting form

Careers

The public careers page. This is what a job seeker sees; it needs no sign-in and lists every published posting. Its address carries your company slug, so each company has its own board.
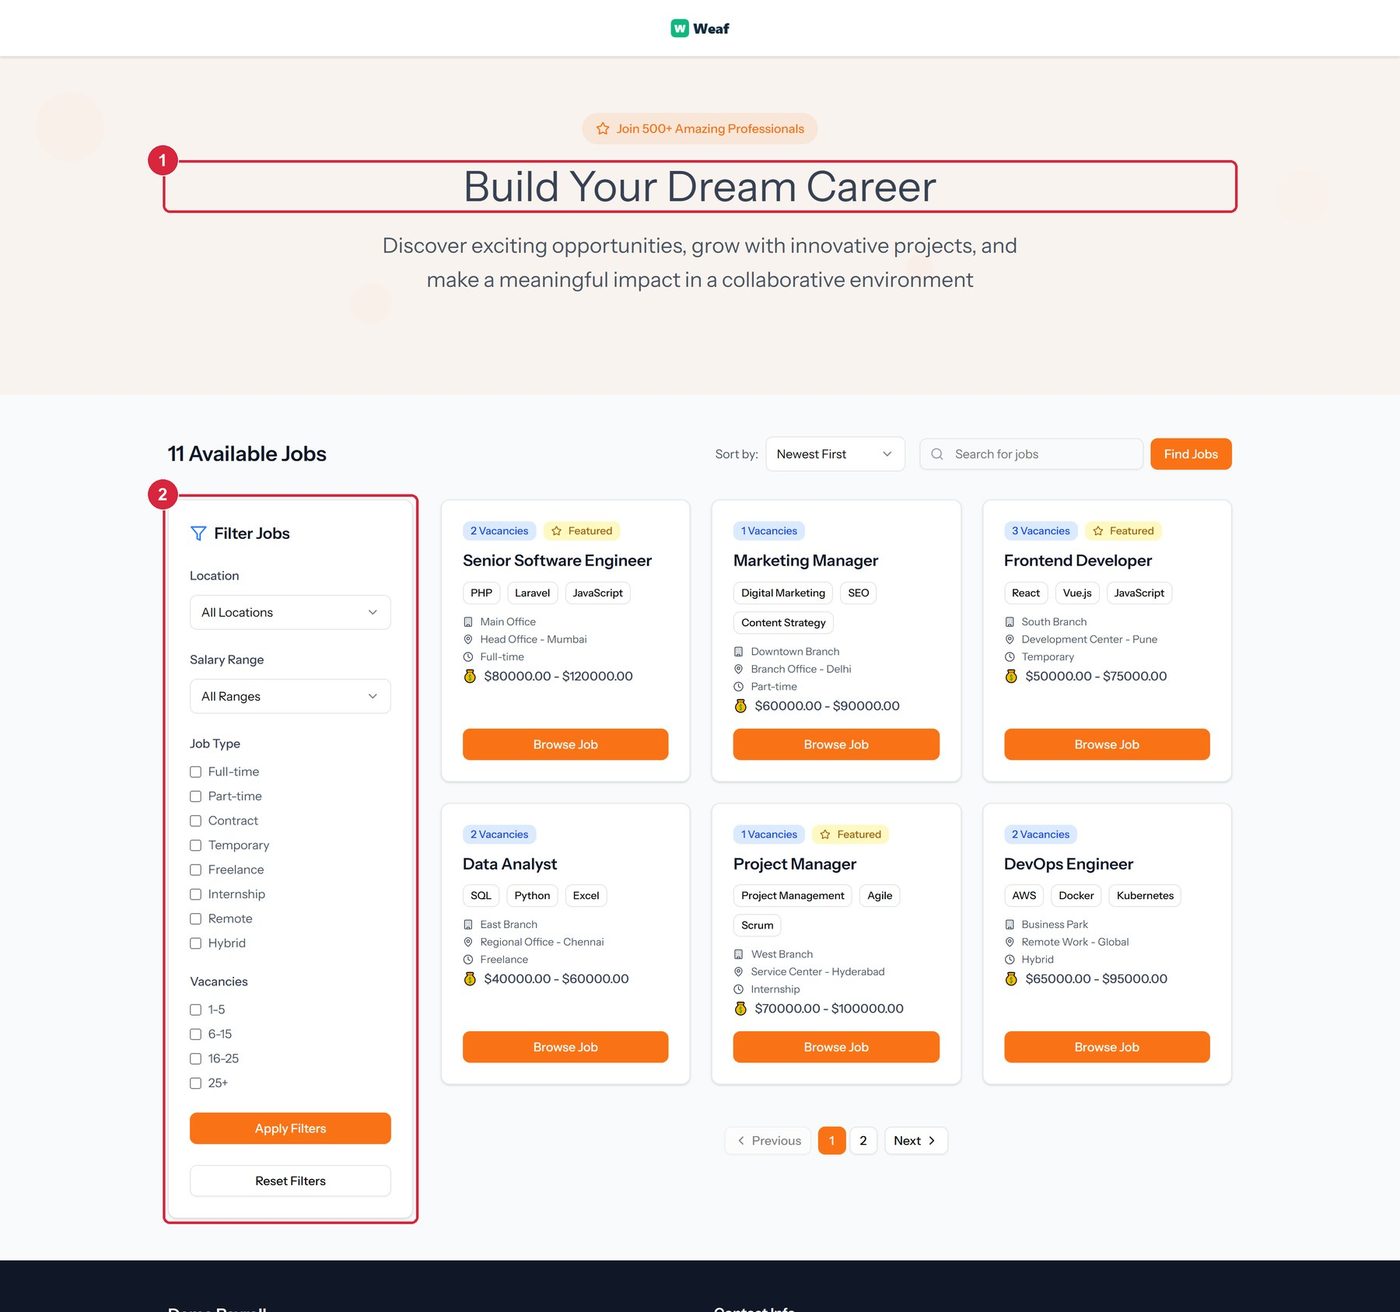
The careers page
The careers page
Note: This page is public. Anything published to a job posting is visible to anyone with the link, so check a posting before publishing it.

Candidate Sources

A reference list. Entries created here become the options offered when you create a candidate, to record where they came from. Setting these up once, before the records that use them, saves correcting the same choice repeatedly later.
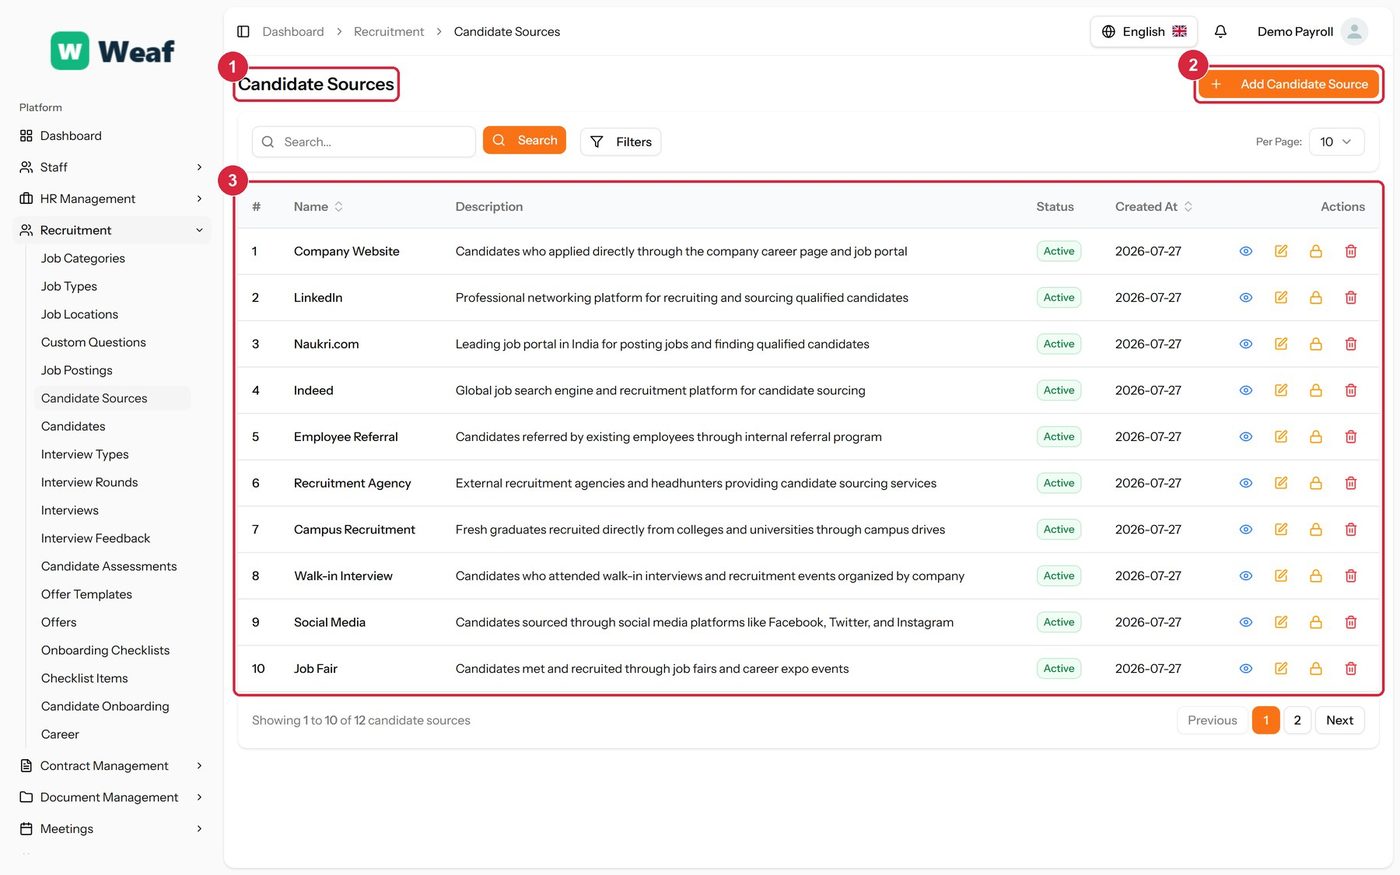
The Candidate Sources page
  • 1 page title
  • 2 primary action
  • 3 records table
Columns
  • #
  • Name
  • Description
  • Status
  • Created At
  • Actions
Actions on this page
  • Add Candidate Source
  1. Choose Add Candidate Source at the top right. The form opens in a panel.
  2. Complete the required fields: Name.
  3. Fill in anything else that applies: Description.
  4. Make the selections the form asks for: Status.
  5. Choose Save. The new record appears in the list.
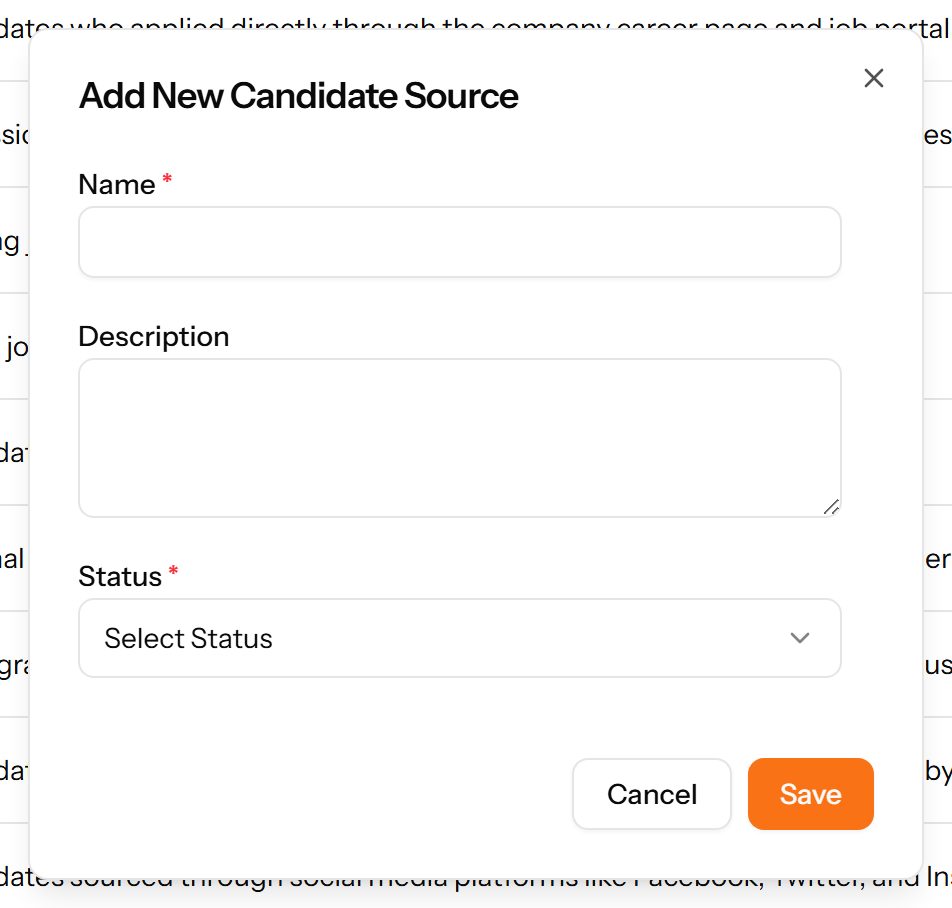
The Add Candidate Source form

Candidates

Everyone who has applied, with the job applied for, where they came from, their experience, their salary expectation and where they have reached in the process.
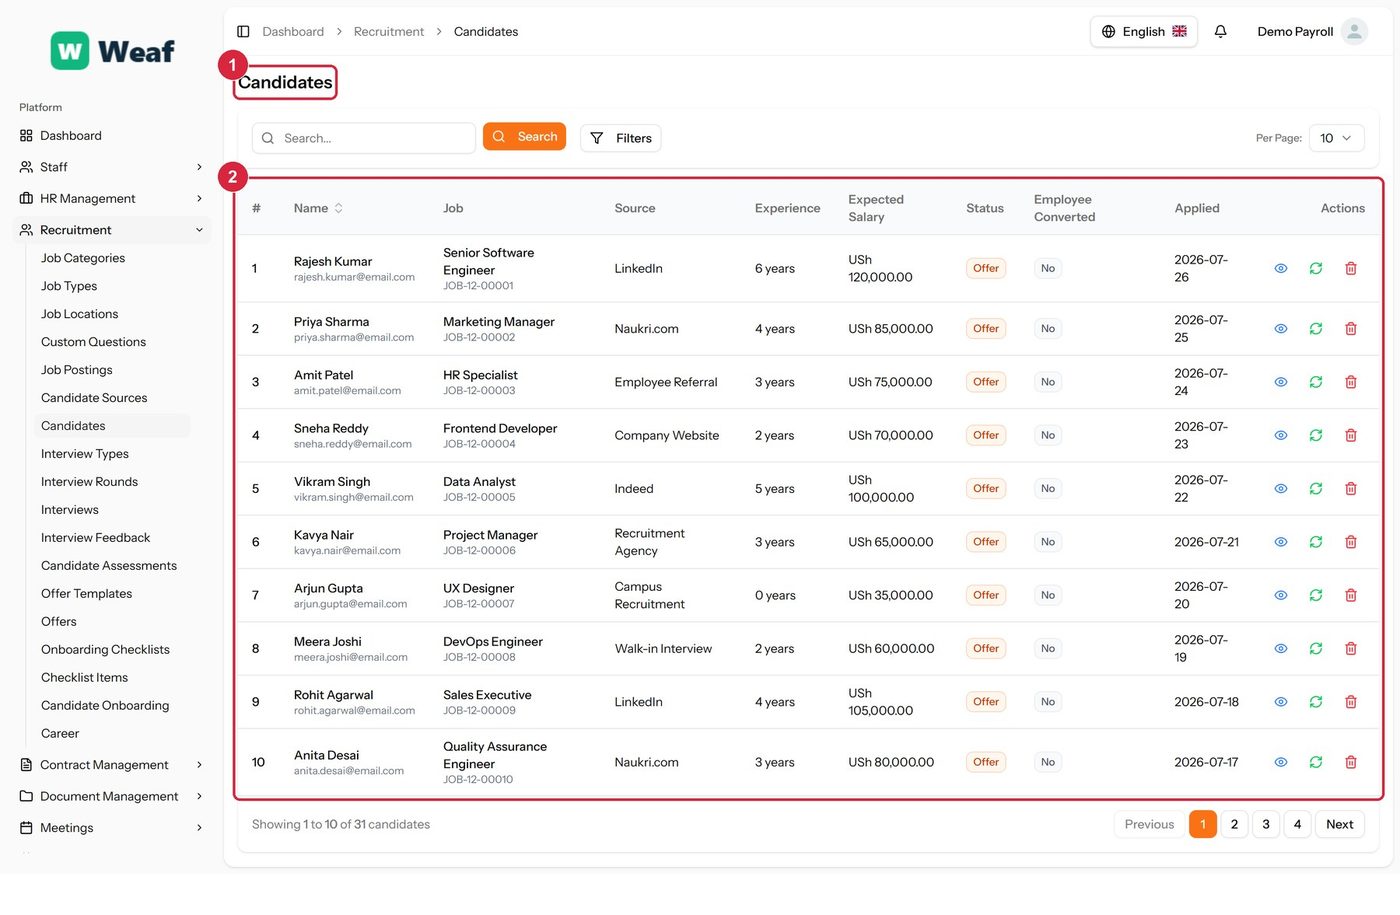
The Candidates page
The Candidates page
  • 1 page title
  • 2 records table
Columns
  • #
  • Name
  • Job
  • Source
  • Experience
  • Expected Salary
  • Status
  • Employee Converted
  • Applied
  • Actions
Note: Candidates arrive by applying to a posting, so there is no Add action here.

Interview Types

A reference list. Entries created here become the options offered when you create an interview. Setting these up once, before the records that use them, saves correcting the same choice repeatedly later.
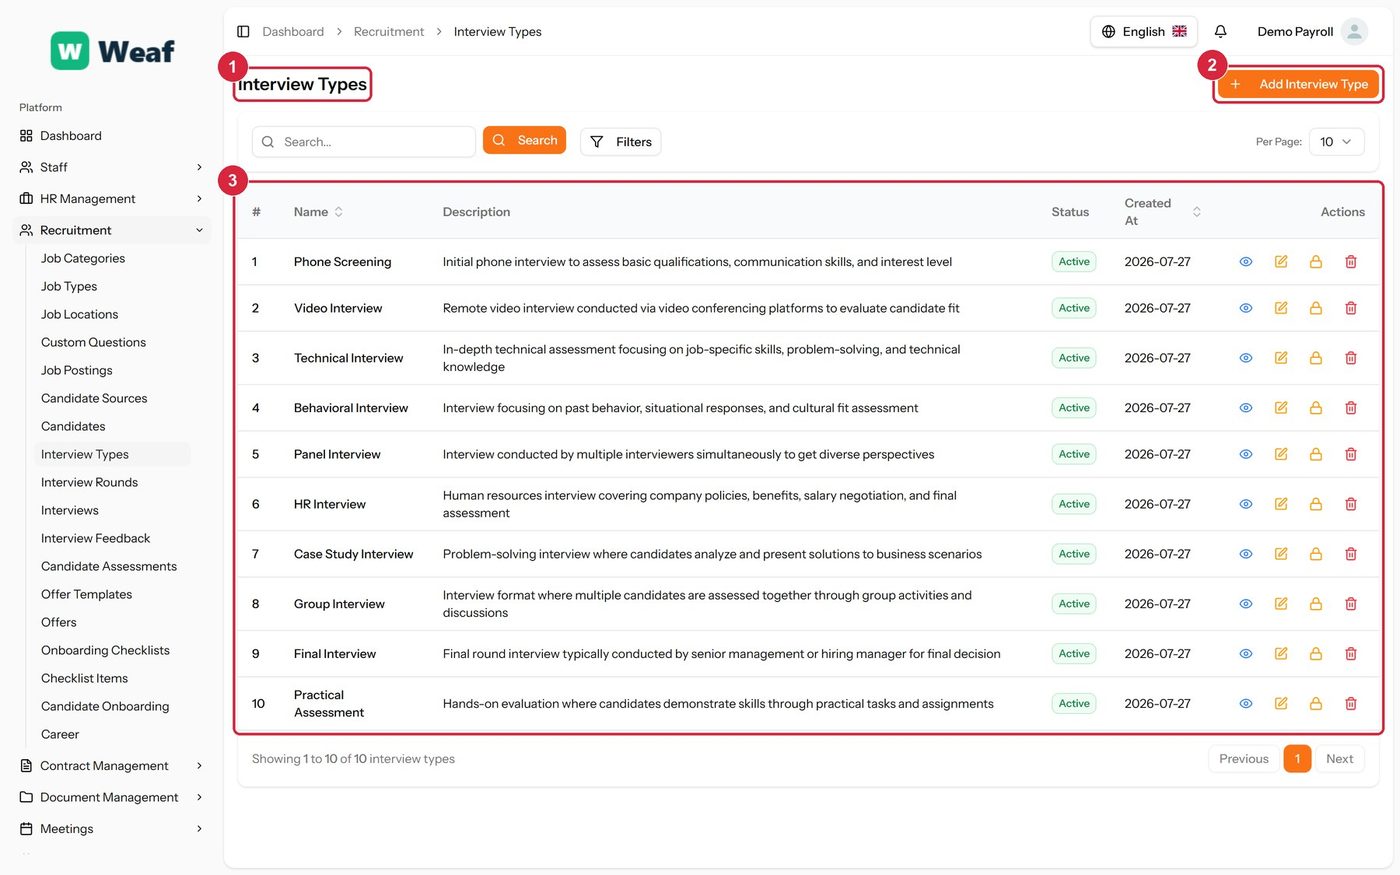
The Interview Types page
  • 1 page title
  • 2 primary action
  • 3 records table
Columns
  • #
  • Name
  • Description
  • Status
  • Created At
  • Actions
Actions on this page
  • Add Interview Type
  1. Choose Add Interview Type at the top right. The form opens in a panel.
  2. Complete the required fields: Name.
  3. Fill in anything else that applies: Description.
  4. Make the selections the form asks for: Status.
  5. Choose Save. The new record appears in the list.
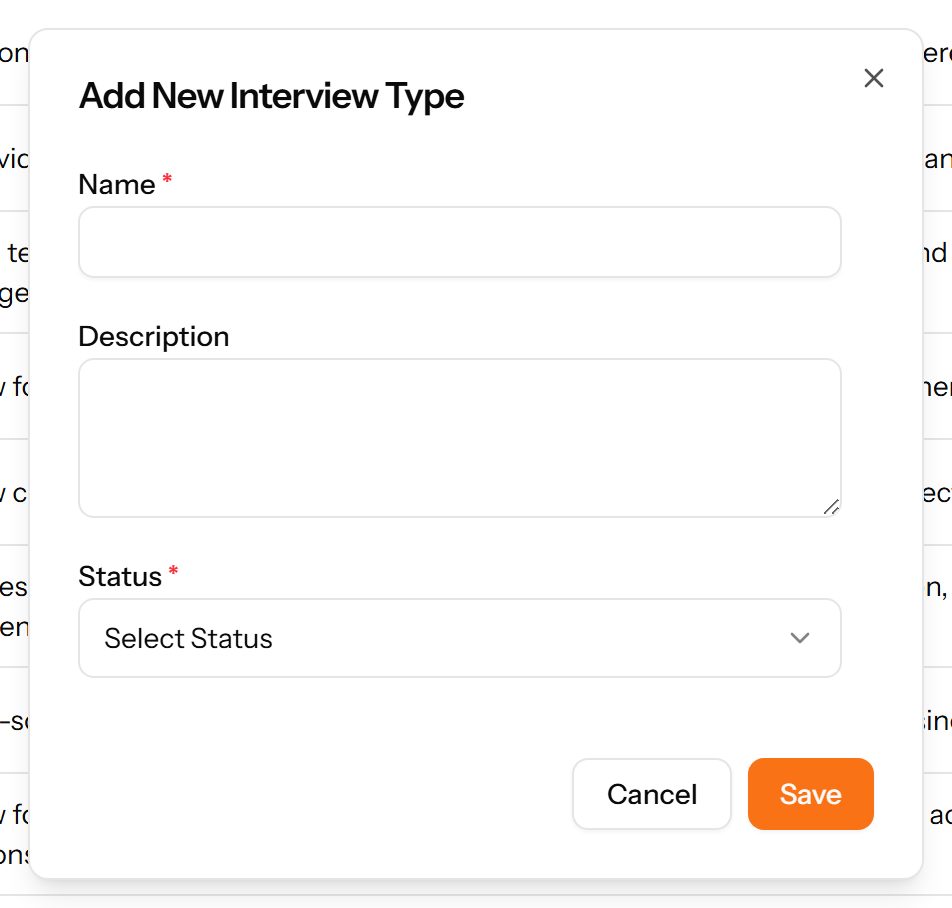
The Add Interview Type form

Interview Rounds

The stages a candidate passes through for a given job, in sequence — screening, technical, final. Defined per job so different roles can be hired differently.
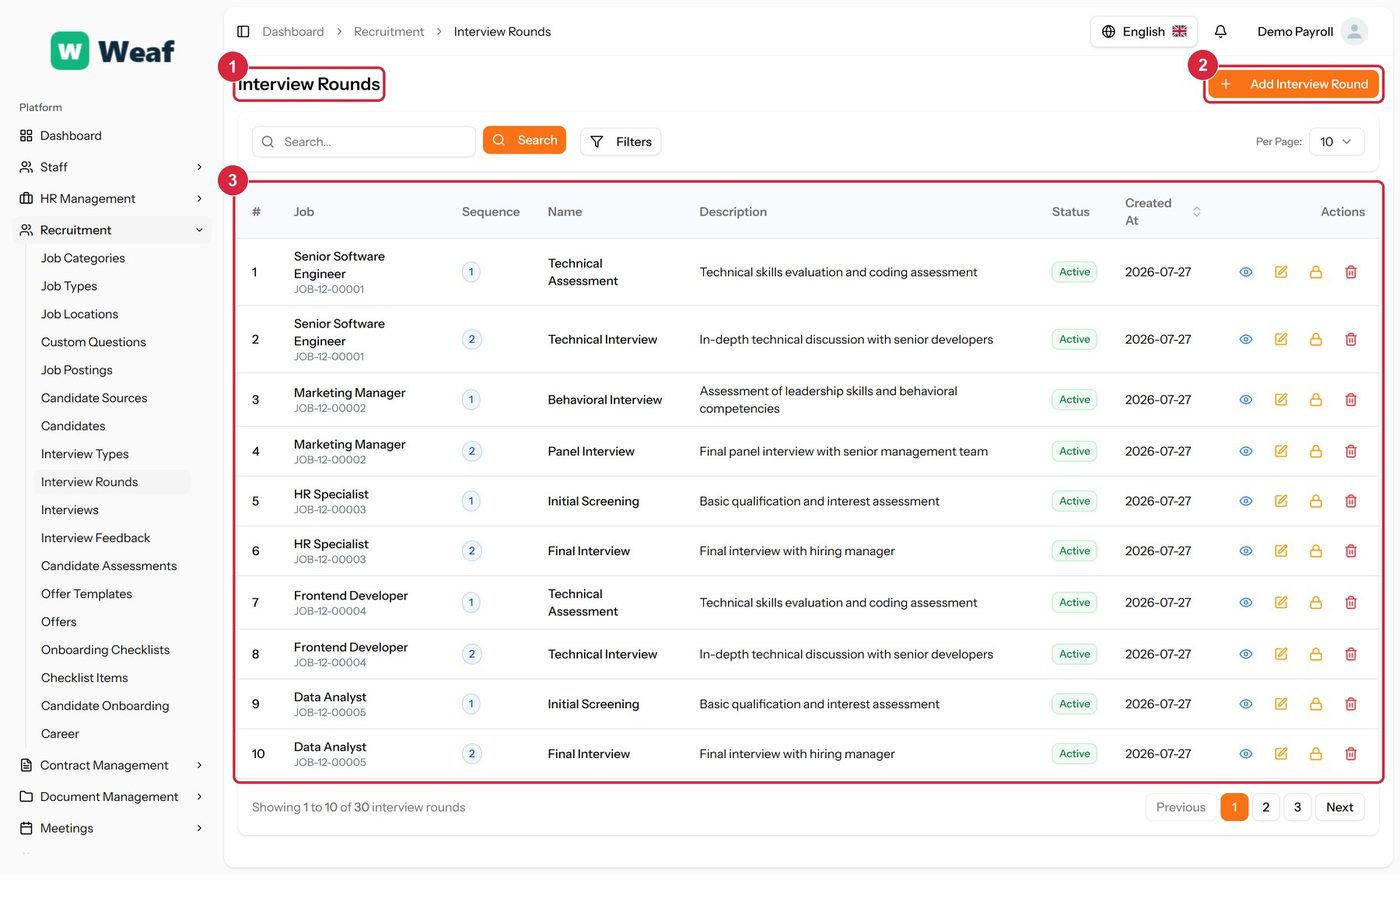
The Interview Rounds page
  • 1 page title
  • 2 primary action
  • 3 records table
Columns
  • #
  • Job
  • Sequence
  • Name
  • Description
  • Status
  • Created At
  • Actions
Actions on this page
  • Add Interview Round
  1. Choose Add Interview Round at the top right. The form opens in a panel.
  2. Complete the required fields: Name, Sequence Number.
  3. Fill in anything else that applies: Description.
  4. Make the selections the form asks for: Job, Status.
  5. Choose Save. The new record appears in the list.
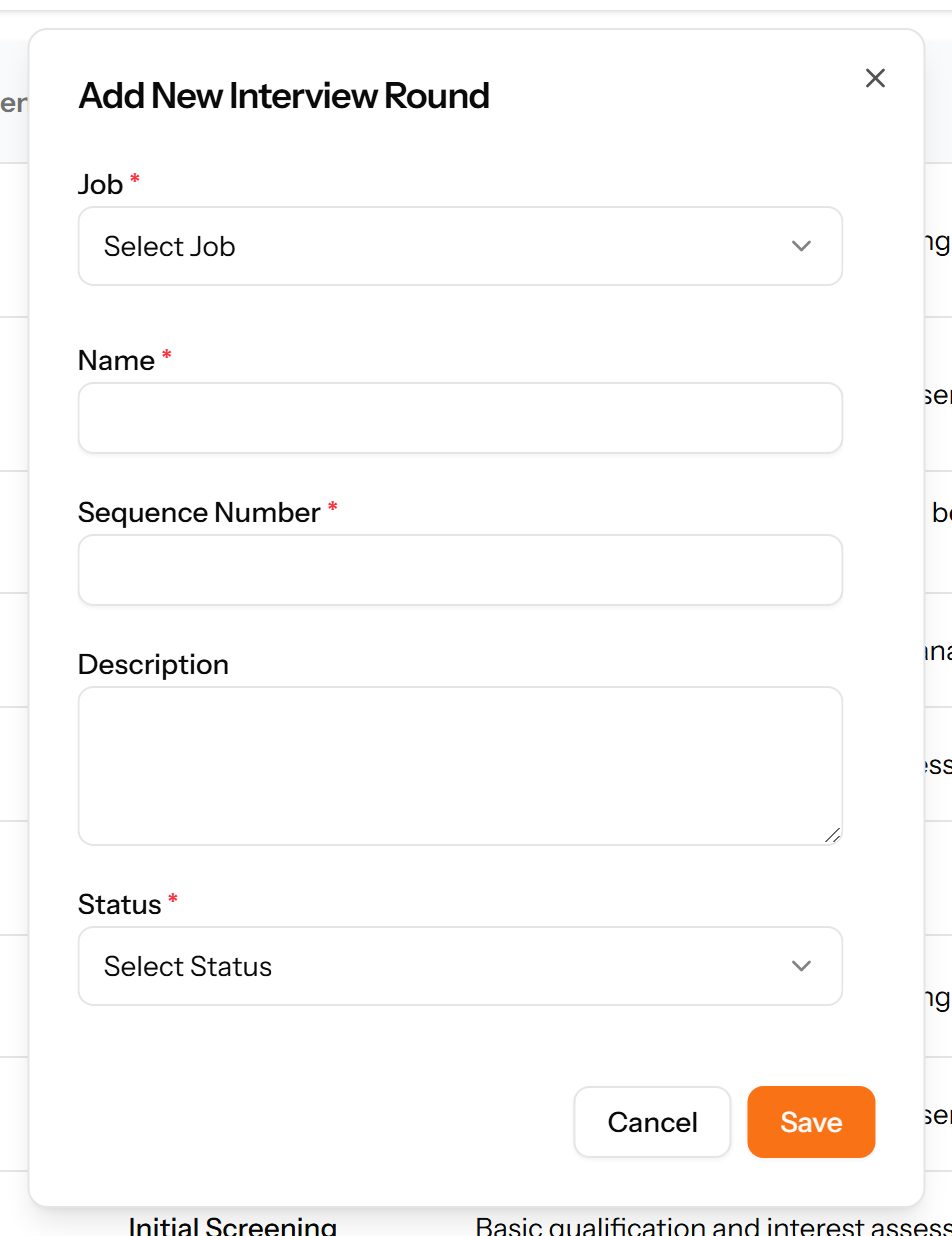
The Add Interview Round form

Interviews

Scheduled interviews: which candidate, which round, what type, when and where.
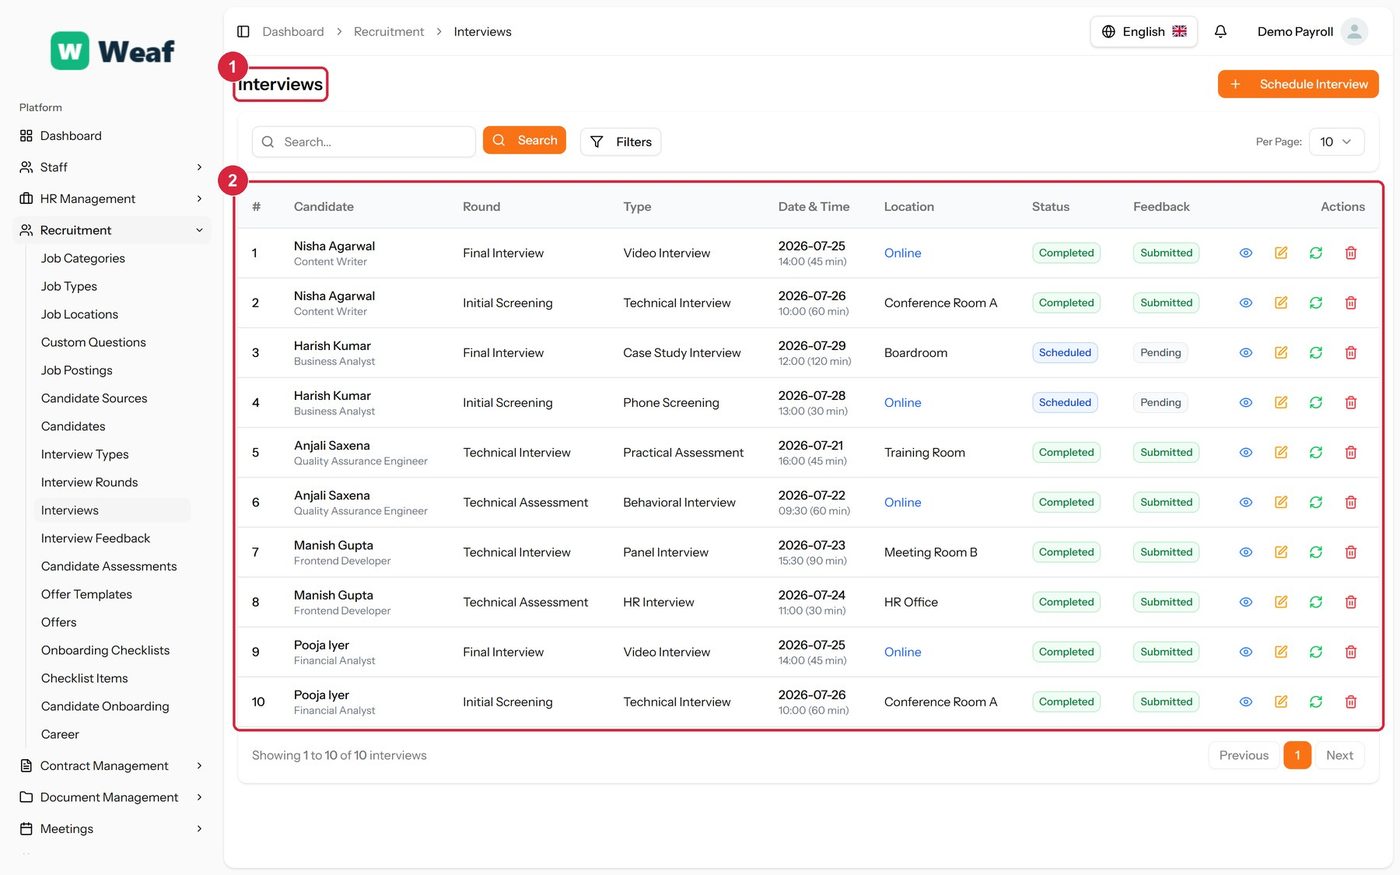
The Interviews page
The Interviews page
  • 1 page title
  • 2 records table
Columns
  • #
  • Candidate
  • Round
  • Type
  • Date & Time
  • Location
  • Status
  • Feedback
  • Actions
Actions on this page
  • Schedule Interview

Interview Feedback

What each interviewer thought, with an overall rating and a recommendation. Separating feedback from the interview itself allows several interviewers to report on the same conversation.
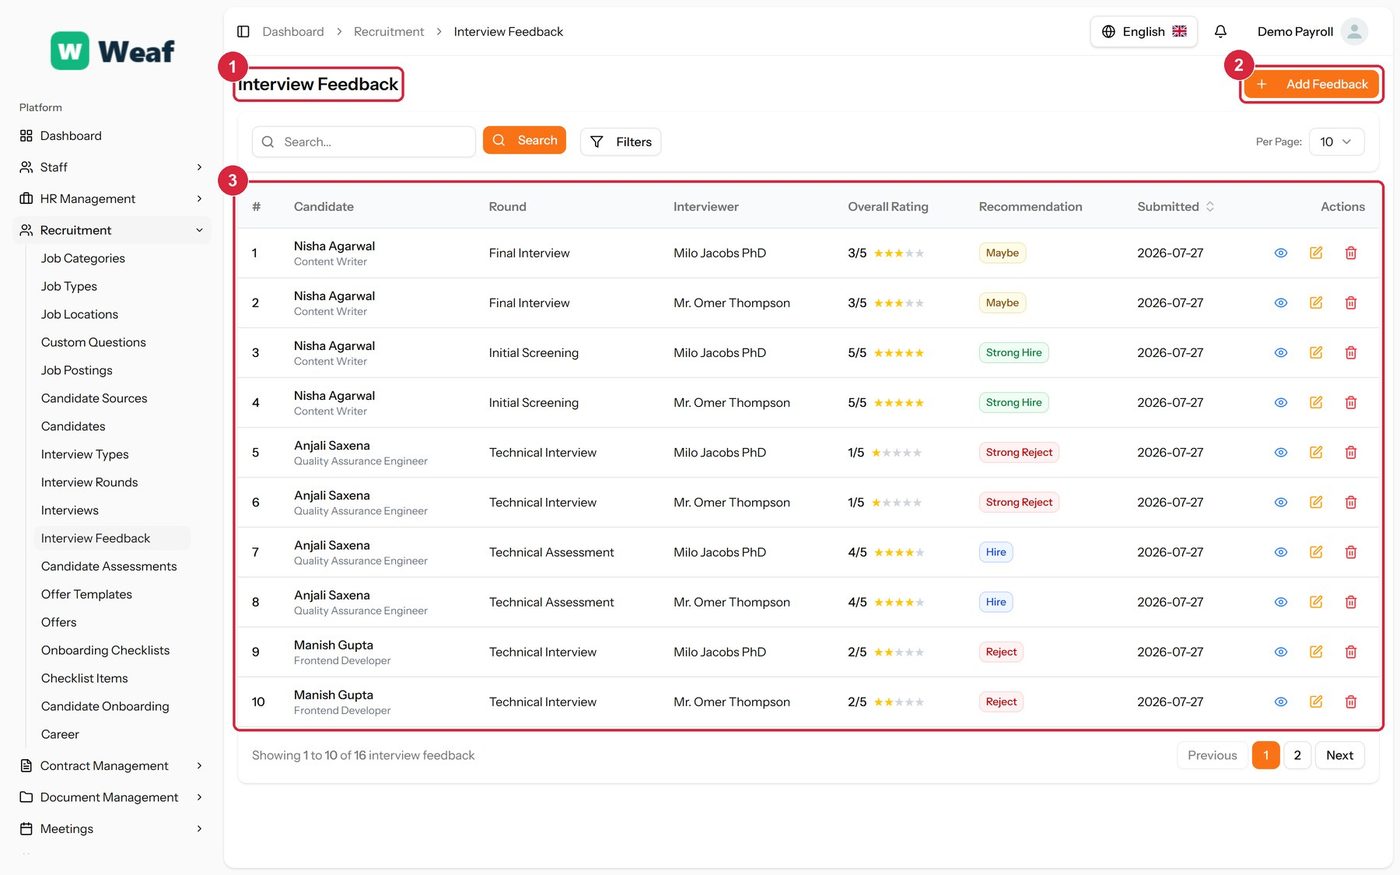
The Interview Feedback page
  • 1 page title
  • 2 primary action
  • 3 records table
Columns
  • #
  • Candidate
  • Round
  • Interviewer
  • Overall Rating
  • Recommendation
  • Submitted
  • Actions
Actions on this page
  • Add Feedback
  1. Choose Add Feedback at the top right. The form opens in a panel.
  2. Fill in anything else that applies: Select Interviewer, Technical Rating (1-5), Communication Rating (1-5), Cultural Fit Rating (1-5), Overall Rating (1-5), Strengths, Weaknesses, Comments.
  3. Make the selections the form asks for: Interview, Recommendation.
  4. Choose Save. The new record appears in the list.
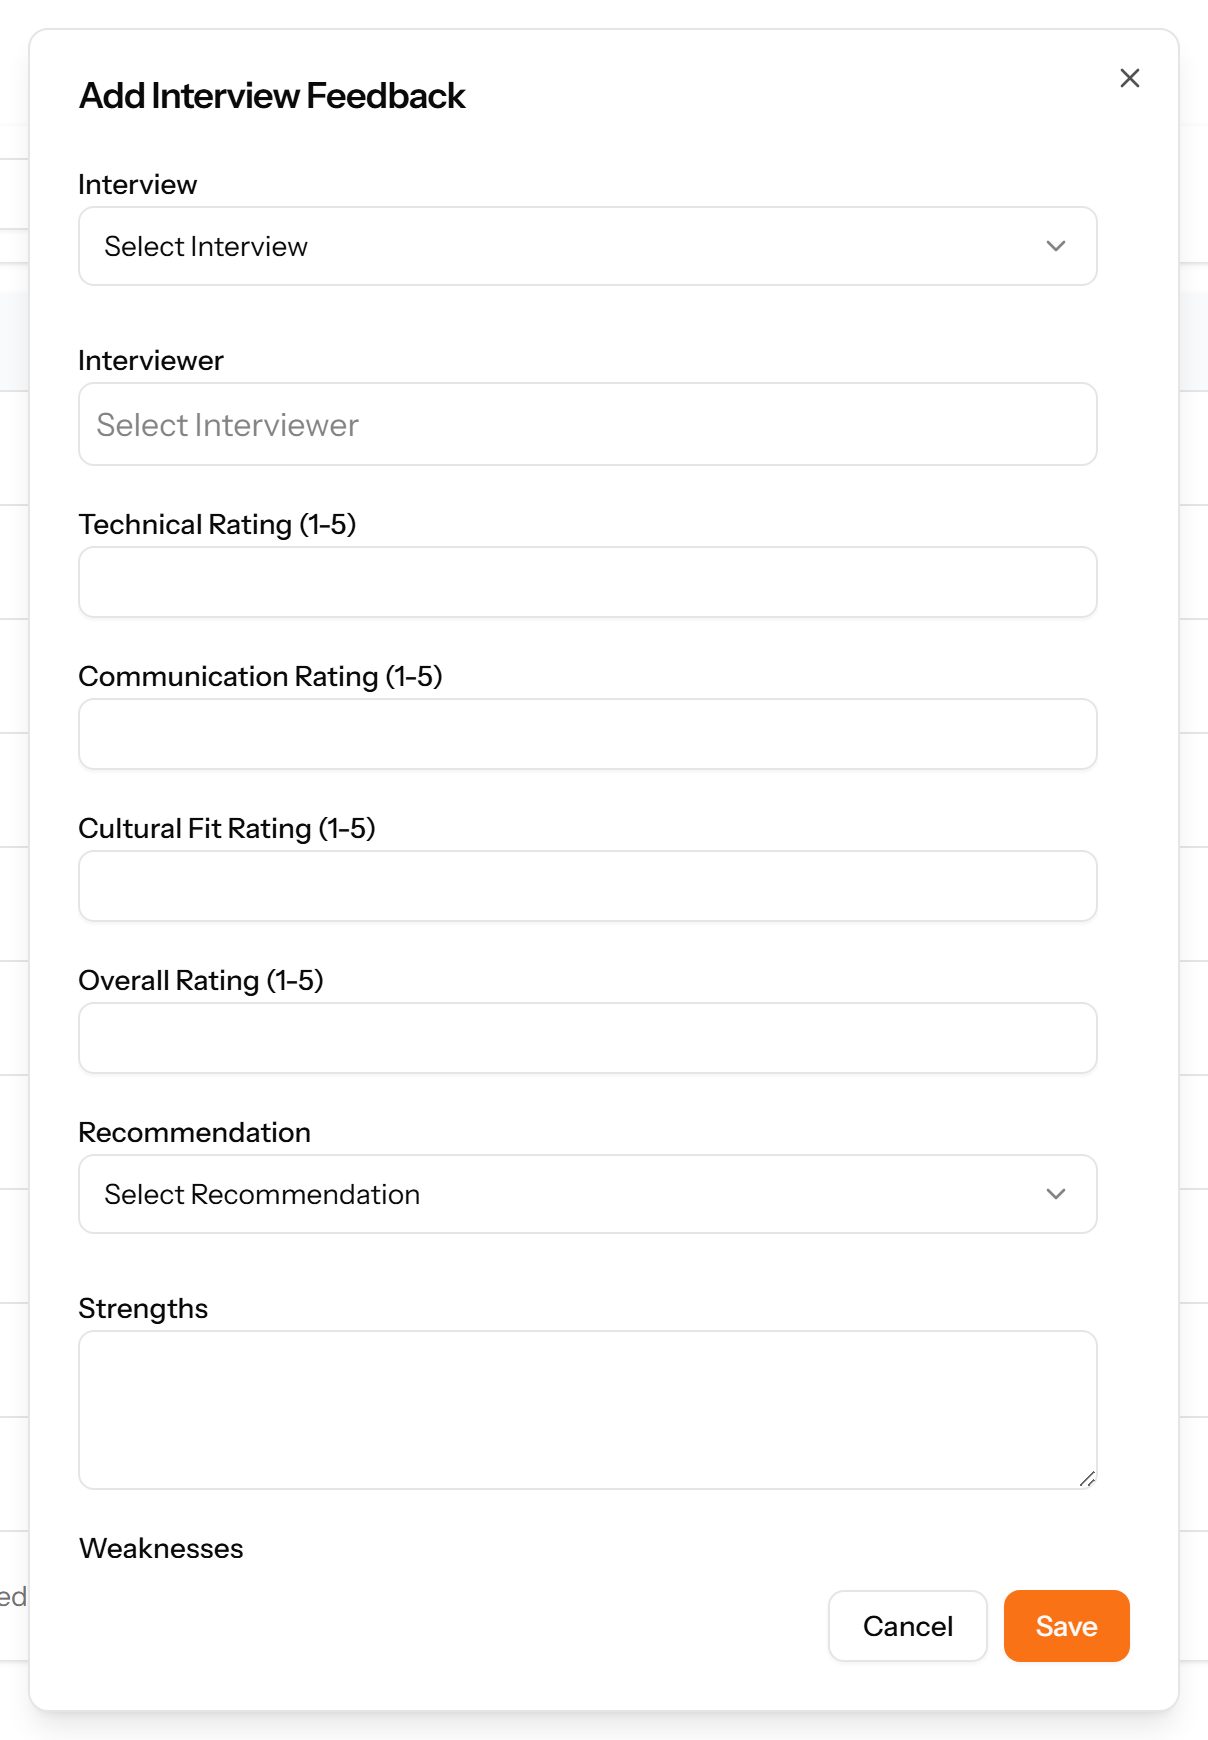
The Add Feedback form

Candidate Assessments

Tests or exercises set for a candidate, with the score achieved and who conducted it.
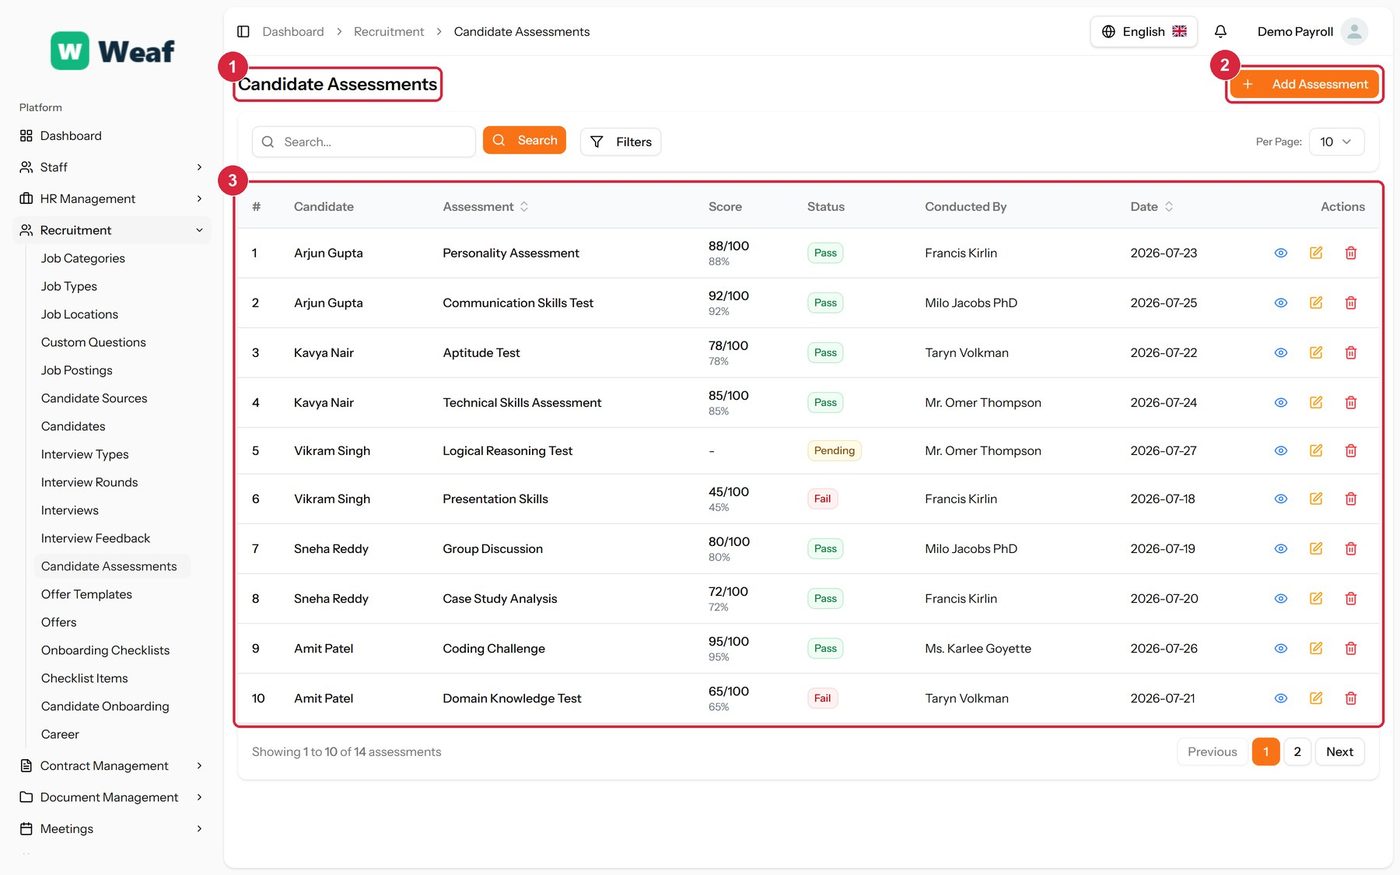
The Candidate Assessments page
  • 1 page title
  • 2 primary action
  • 3 records table
Columns
  • #
  • Candidate
  • Assessment
  • Score
  • Status
  • Conducted By
  • Date
  • Actions
Actions on this page
  • Add Assessment
  1. Choose Add Assessment at the top right. The form opens in a panel.
  2. Complete the required fields: Assessment Name, Assessment Date.
  3. Fill in anything else that applies: Score, Max Score, Comments.
  4. Make the selections the form asks for: Candidate, Status, Employee.
  5. Choose Save. The new record appears in the list.
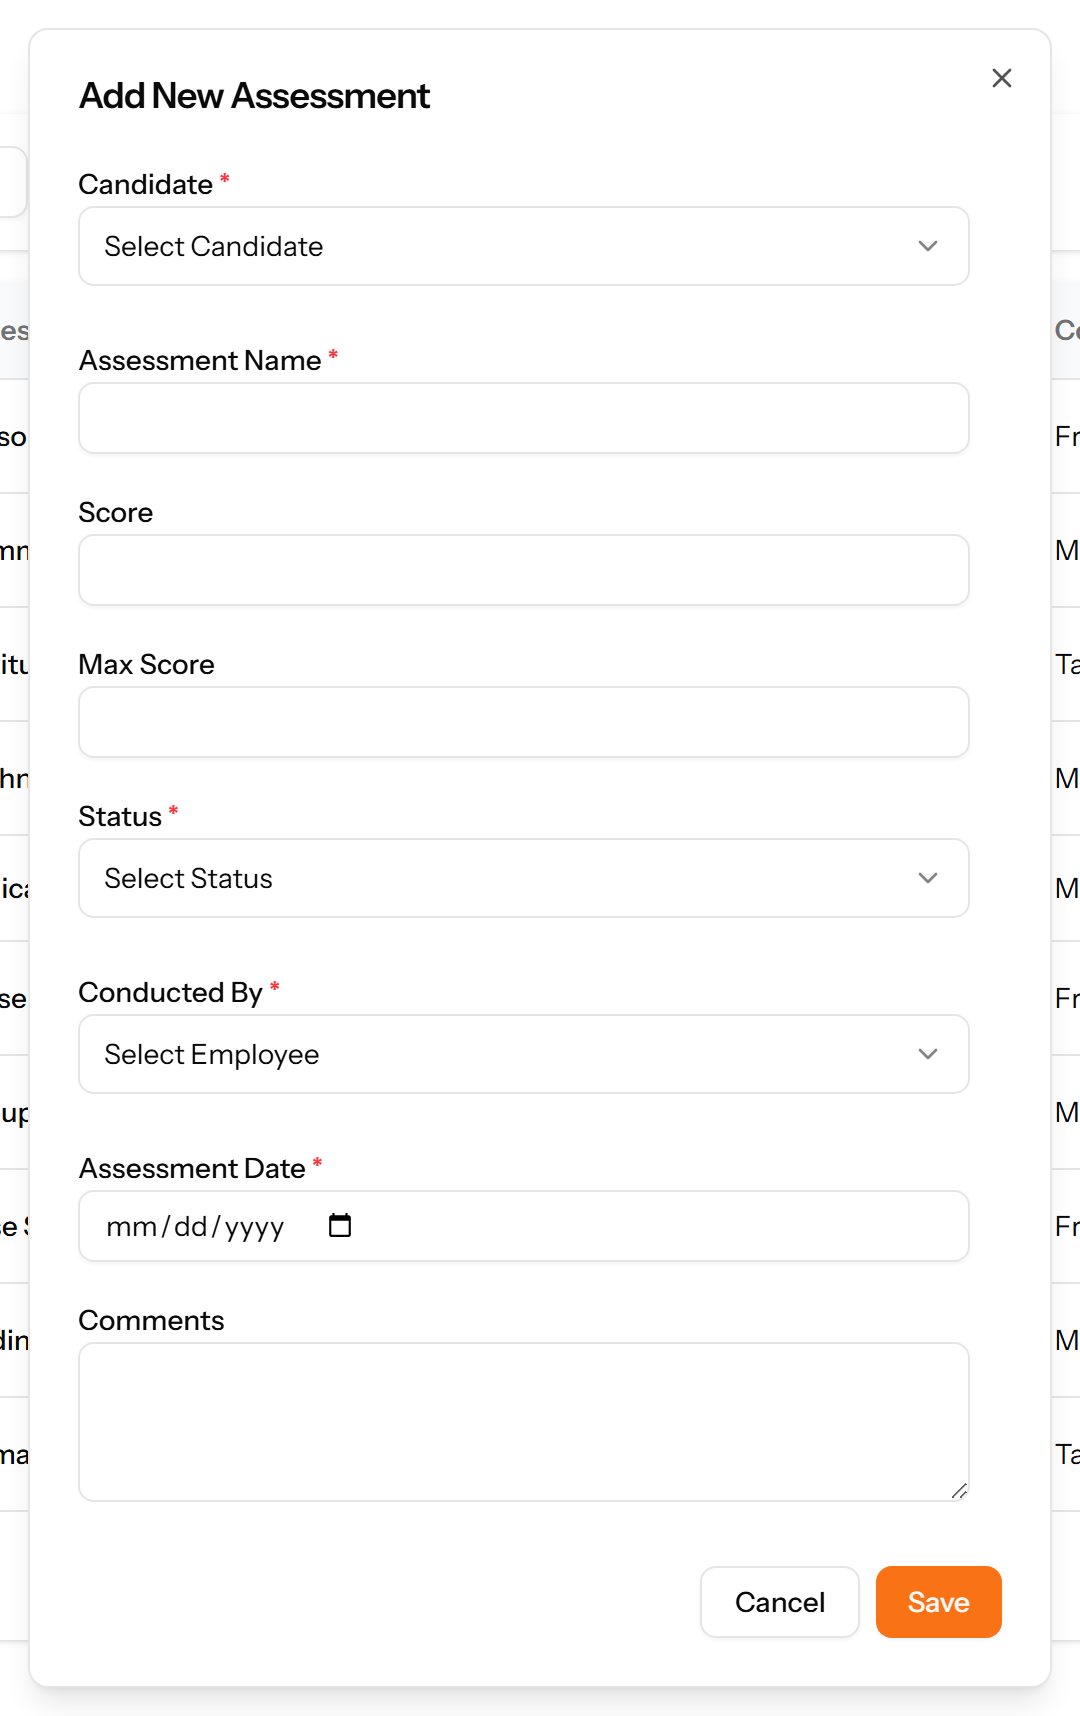
The Add Assessment form

Offer Templates

Reusable offer letter wording with placeholders that are filled in for each candidate, so every offer is consistent.
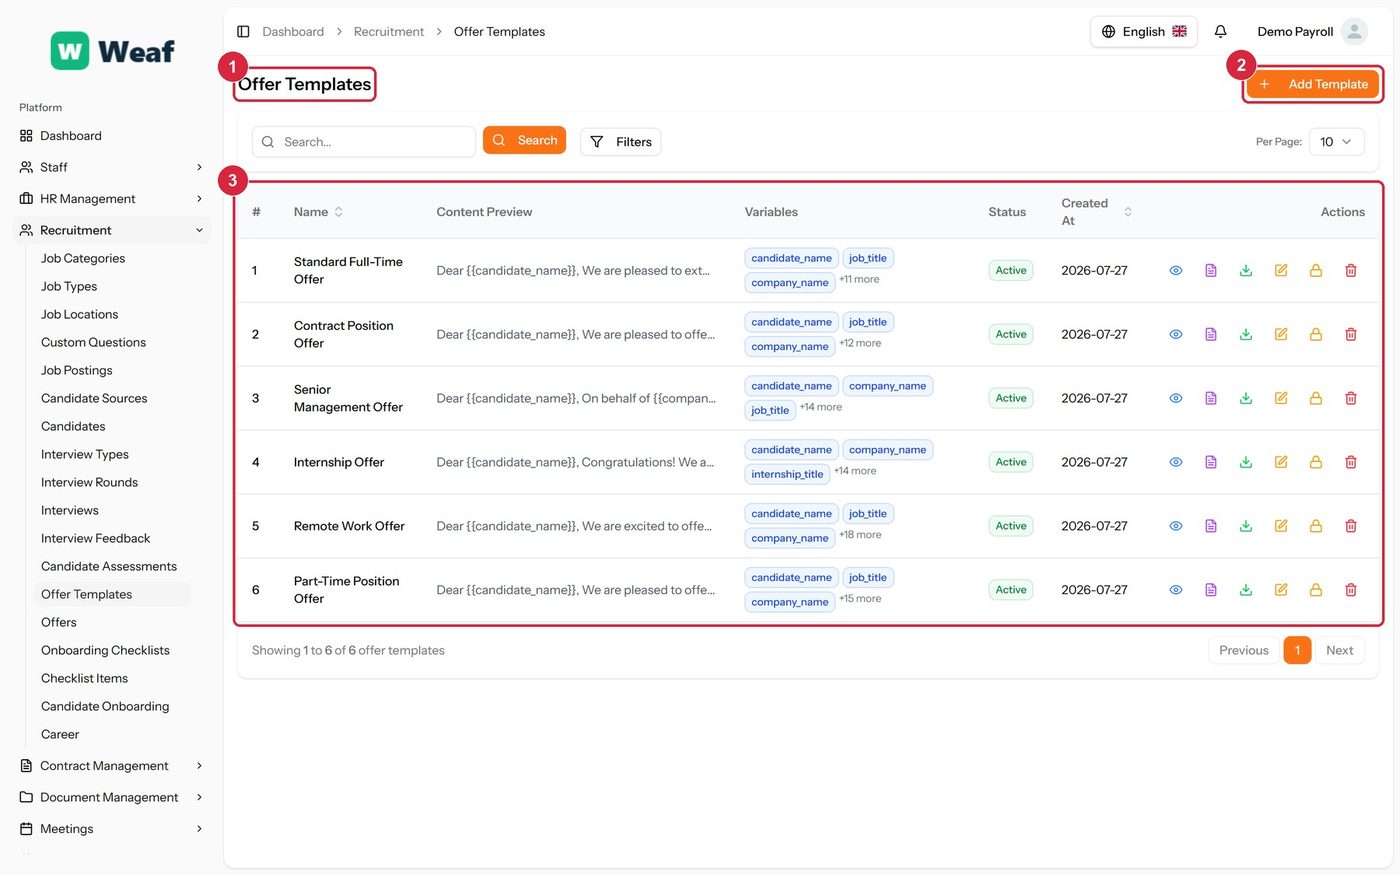
The Offer Templates page
  • 1 page title
  • 2 primary action
  • 3 records table
Columns
  • #
  • Name
  • Content Preview
  • Variables
  • Status
  • Created At
  • Actions
Actions on this page
  • Add Template
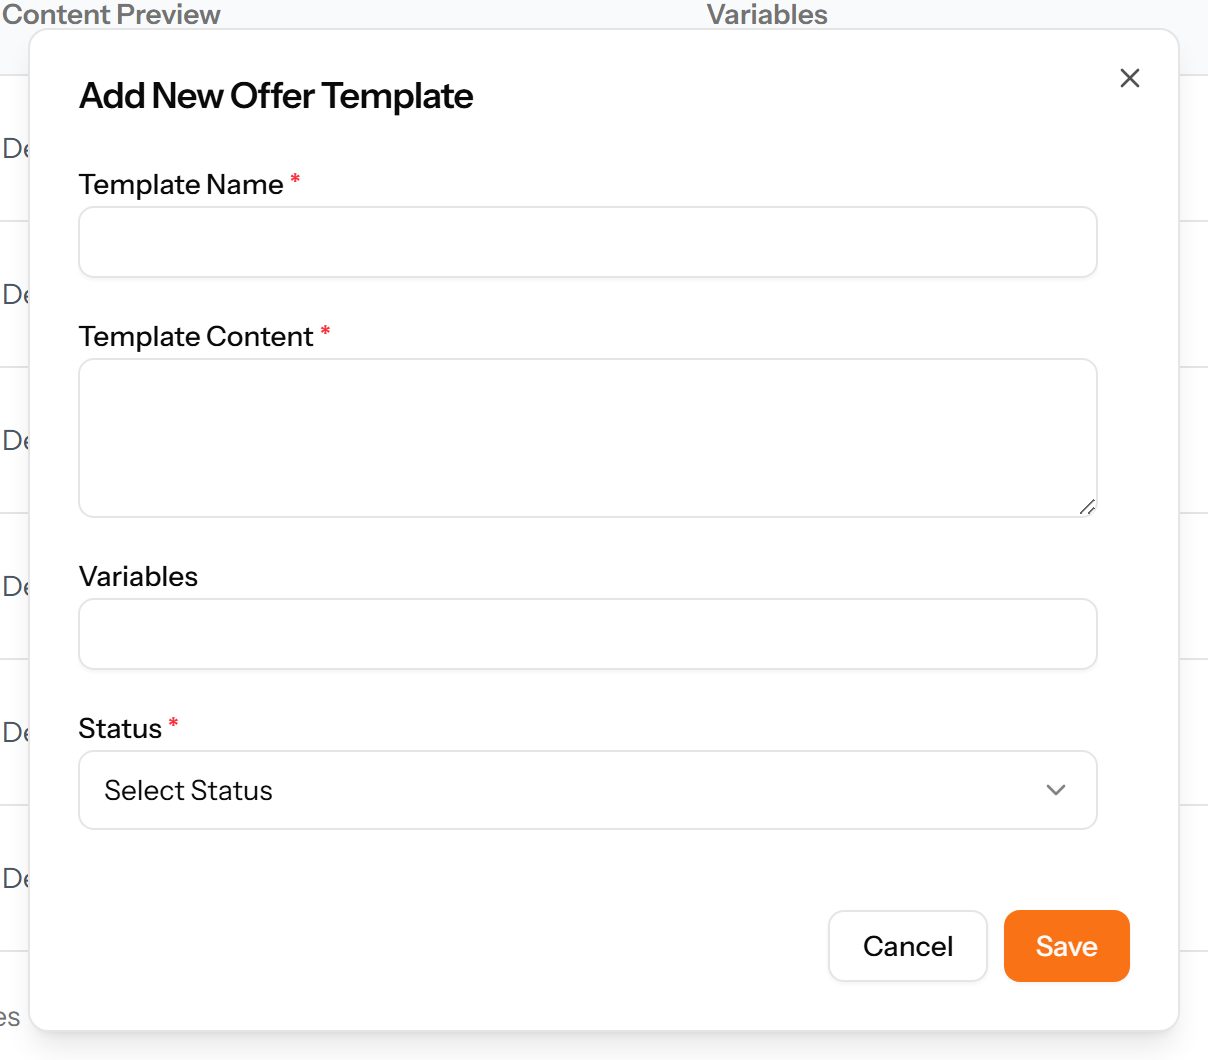
  1. Choose Add Template at the top right. The form opens in a panel.
  2. Complete the required fields: Template Name, Template Content.
  3. Fill in anything else that applies: Variables.
  4. Make the selections the form asks for: Status.
  5. Choose Save. The new record appears in the list.
The Add Template form

Offers

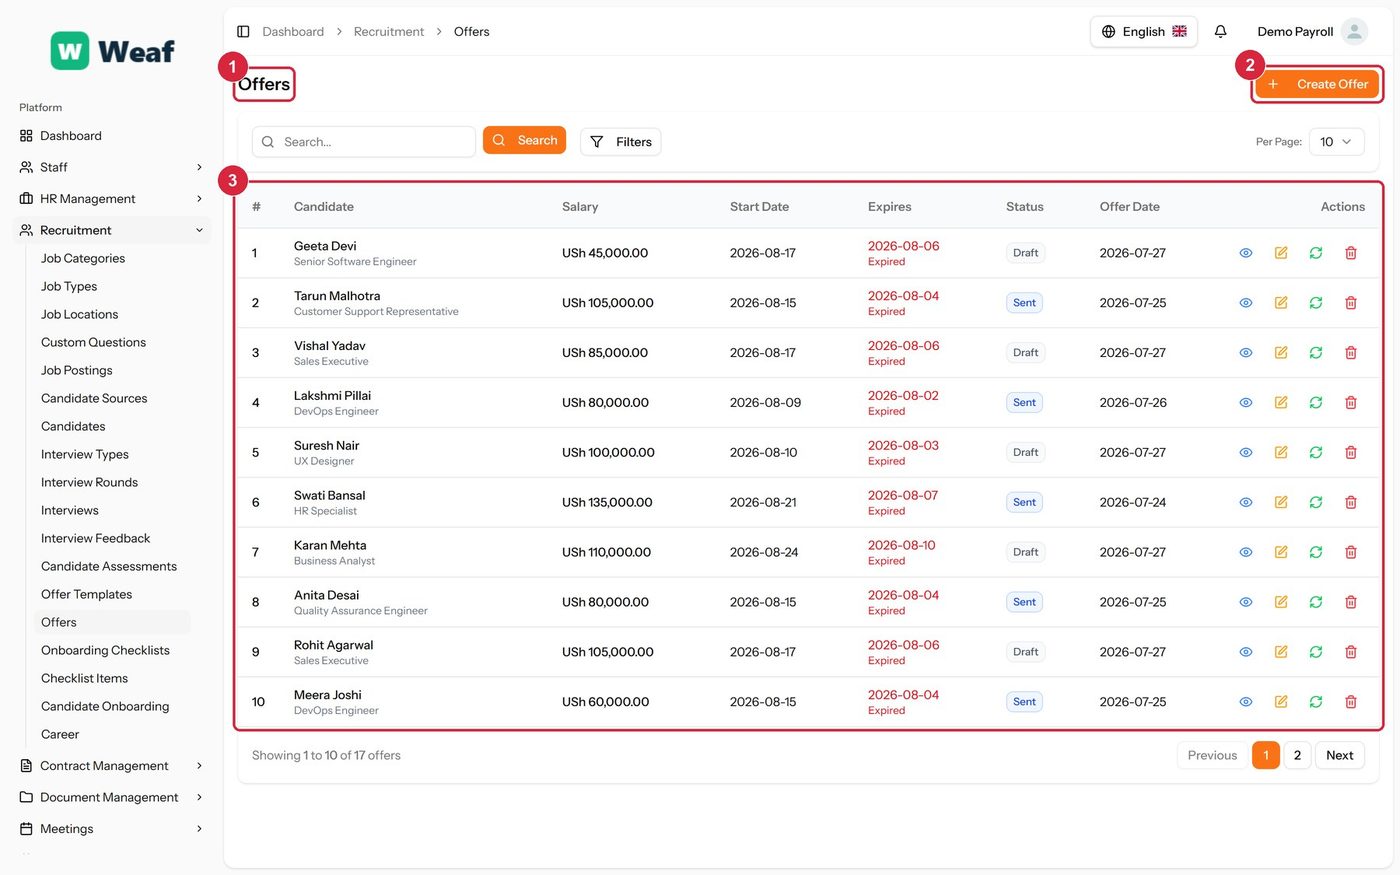
Offers made: the salary, the proposed start date, when the offer expires and whether it has been accepted.
The Offers page
The Offers page
  • 1 page title
  • 2 primary action
  • 3 records table
Columns
  • #
  • Candidate
  • Salary
  • Start Date
  • Expires
  • Status
  • Offer Date
  • Actions
Actions on this page
  • Create Offer
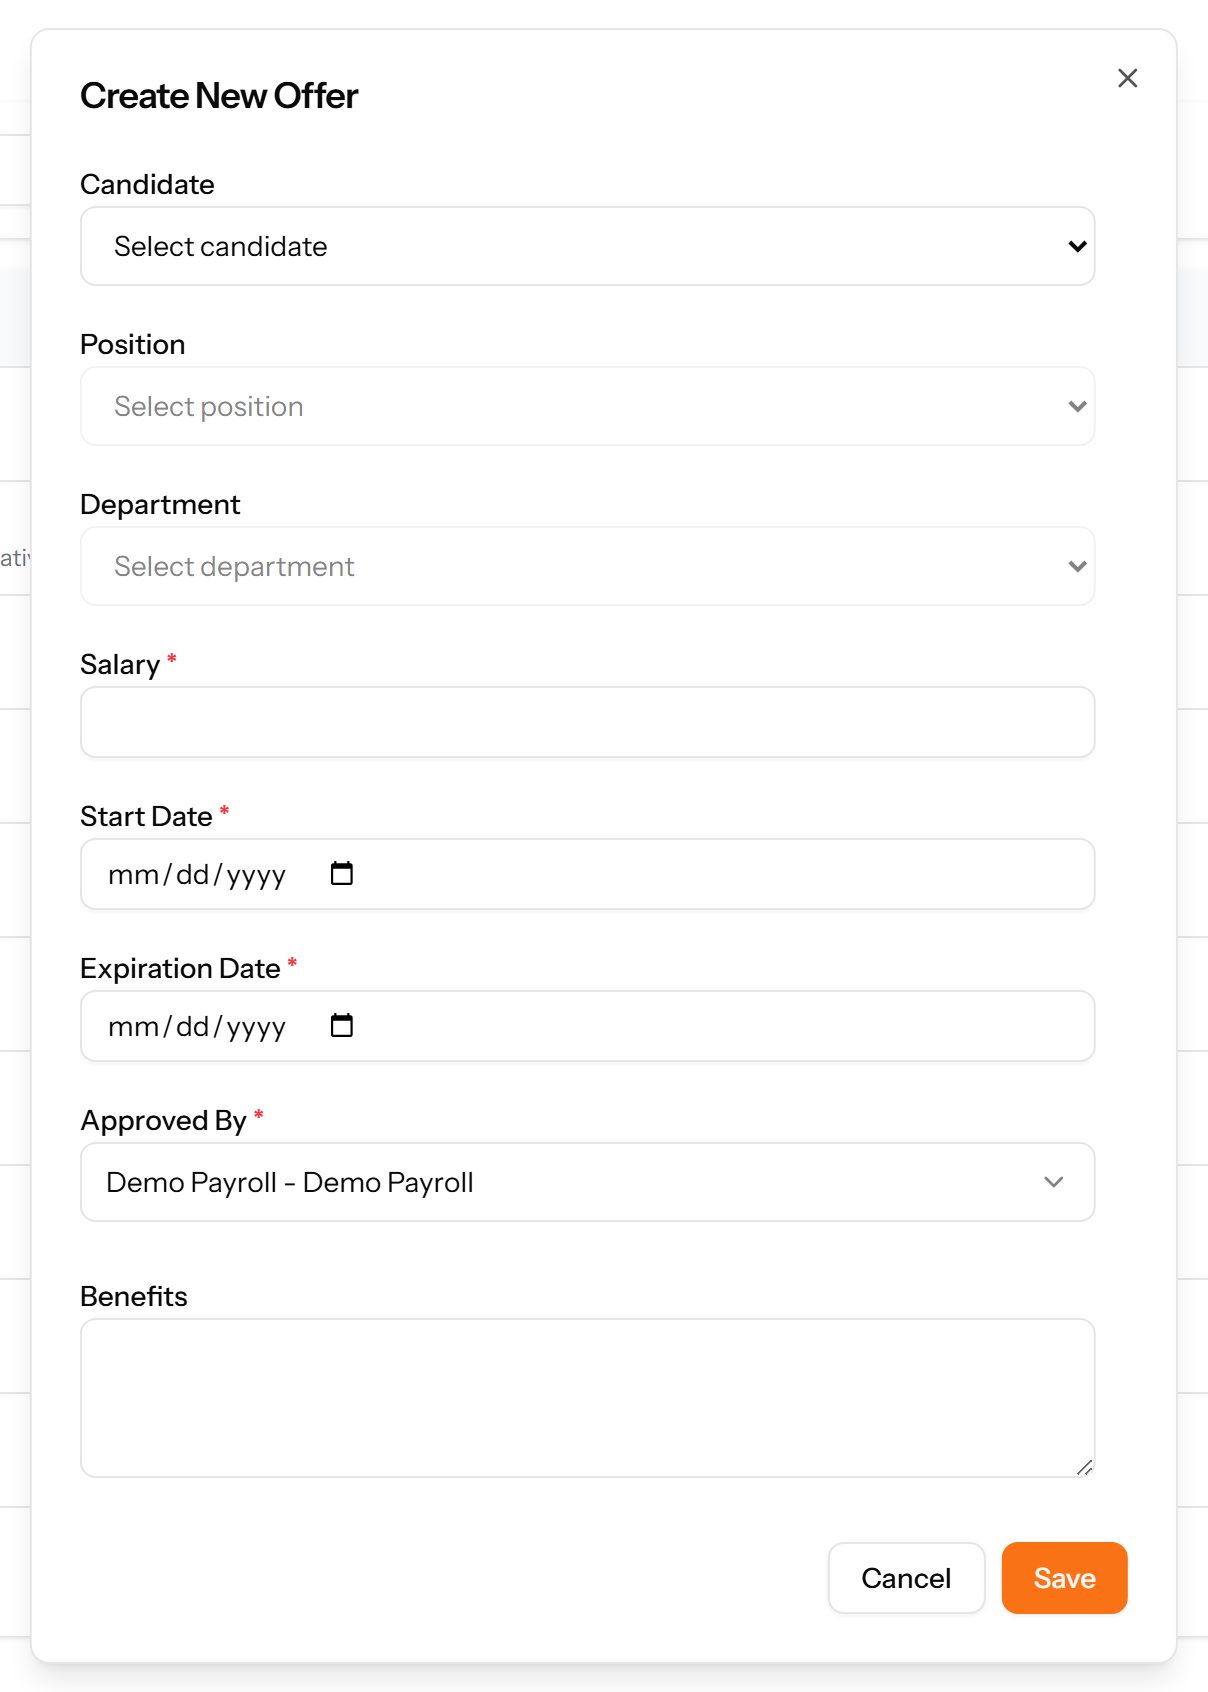
  1. Choose Create Offer at the top right. The form opens in a panel.
  2. Complete the required fields: Salary, Start Date, Expiration Date.
  3. Fill in anything else that applies: Candidate, Position, Department, Benefits.
  4. Choose Save. The new record appears in the list.
The Create Offer form

Onboarding Checklists

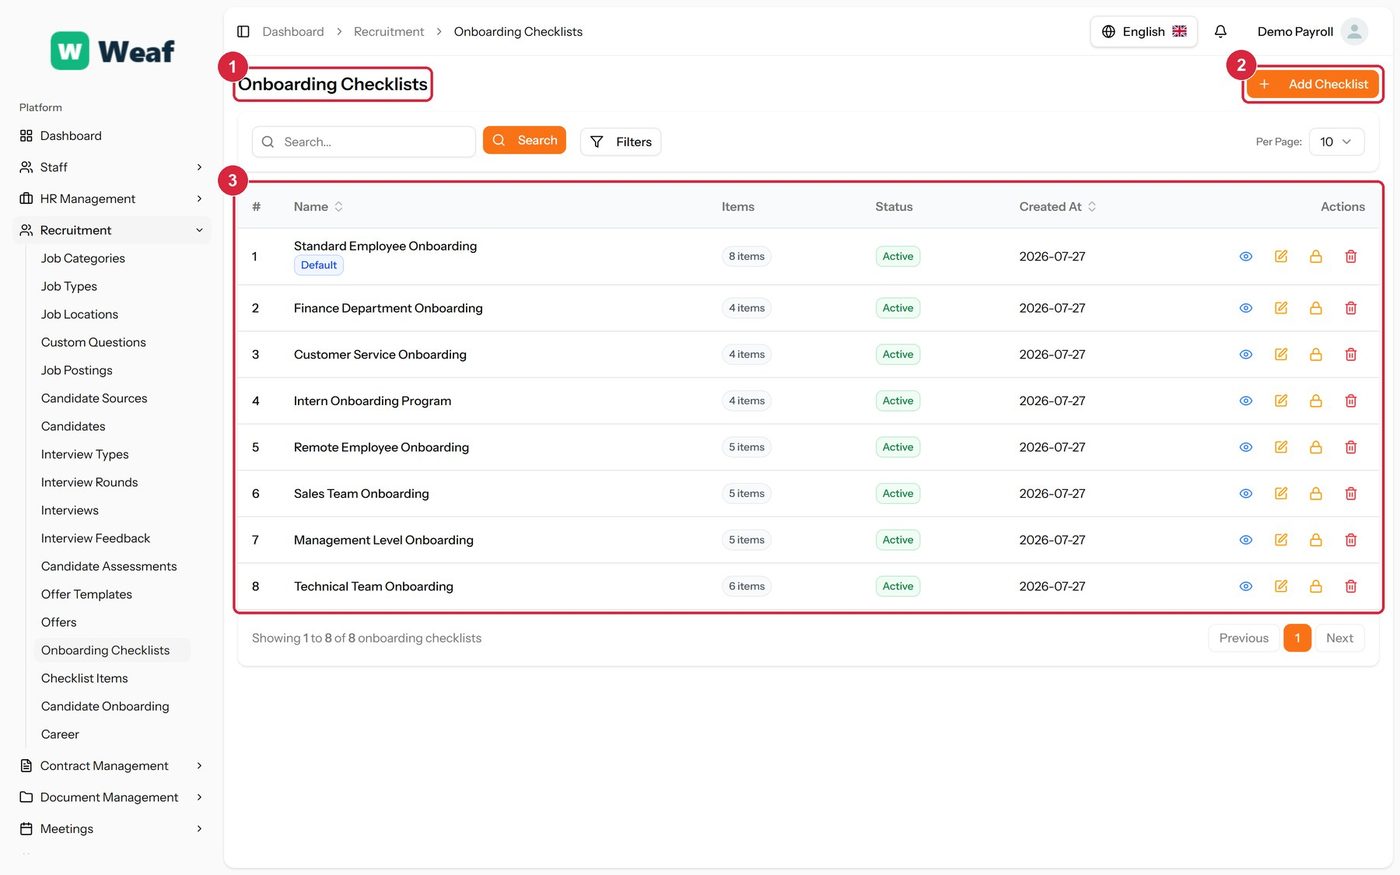
A named list of everything a new joiner must complete. Built once, then applied to each new starter.
The Onboarding Checklists page
  • 1 page title
  • 2 primary action
  • 3 records table
Columns
  • #
  • Name
  • Items
  • Status
  • Created At
  • Actions
Actions on this page
  • Add Checklist
  1. Choose Add Checklist at the top right. The form opens in a panel.
  2. Complete the required fields: Checklist Name.
  3. Fill in anything else that applies: Description, Set as Default.
  4. Make the selections the form asks for: Status.
  5. Choose Save. The new record appears in the list.
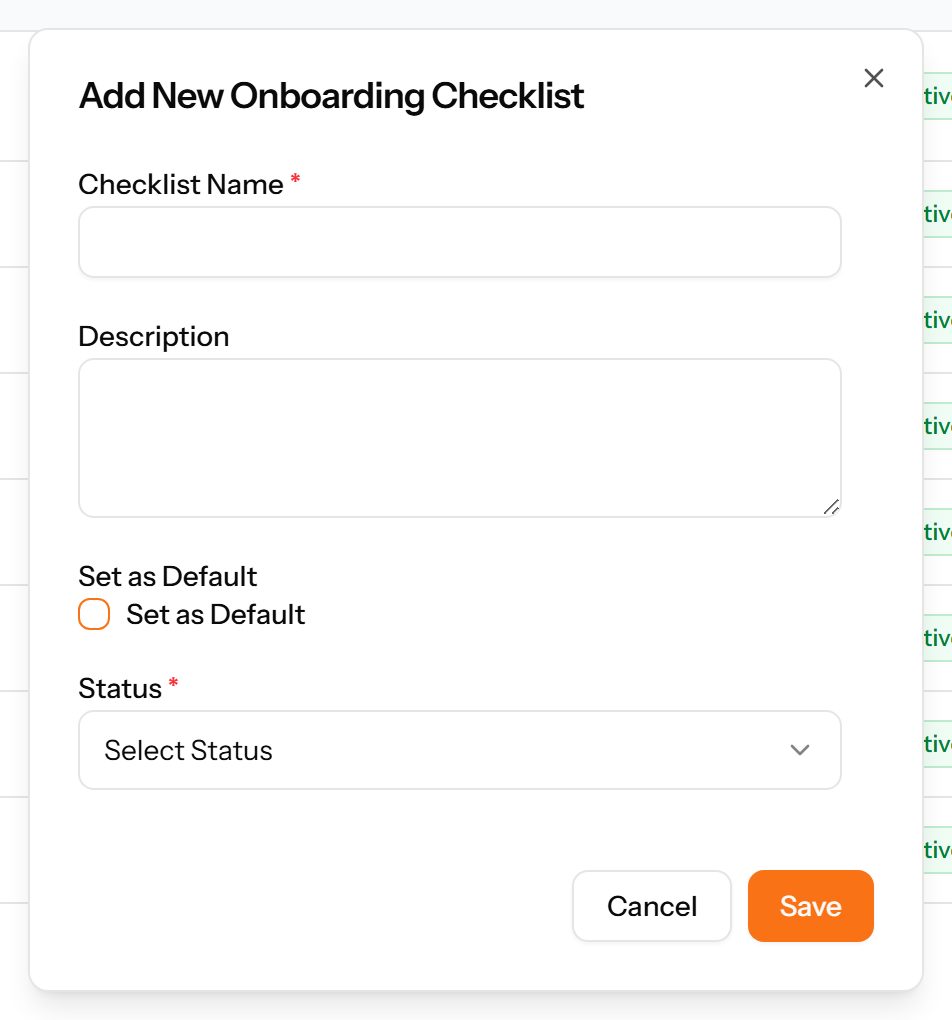
The Add Checklist form

Checklist Items

The individual tasks that make up the checklists, each belonging to a checklist and a category.
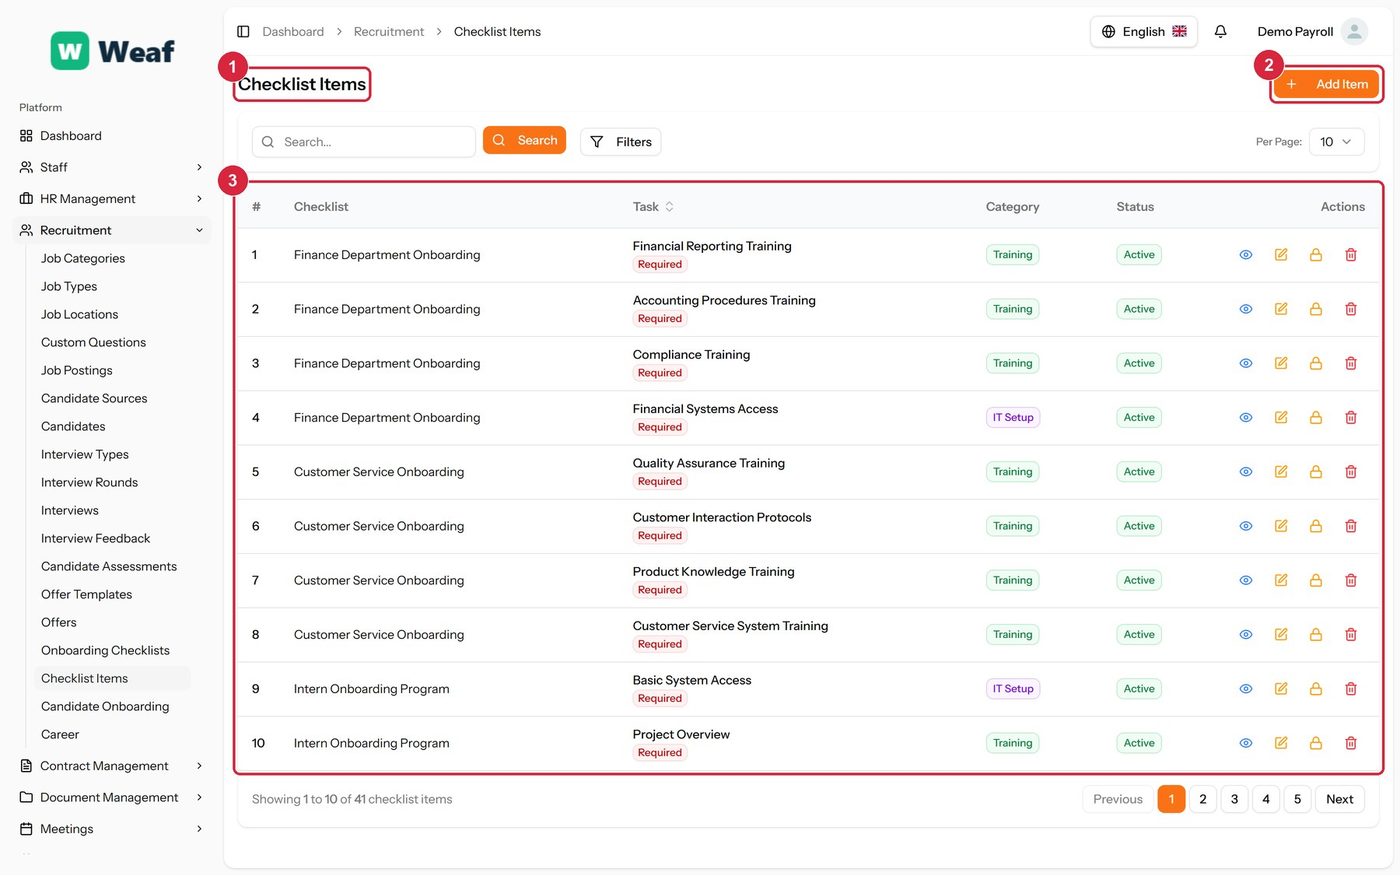
The Checklist Items page
  • 1 page title
  • 2 primary action
  • 3 records table
Columns
  • #
  • Checklist
  • Task
  • Category
  • Status
  • Actions
Actions on this page
  • Add Item
  1. Choose Add Item at the top right. The form opens in a panel.
  2. Complete the required fields: Task Name.
  3. Fill in anything else that applies: Description, Required Task.
  4. Make the selections the form asks for: Checklist, Category, Status.
  5. Choose Save. The new record appears in the list.
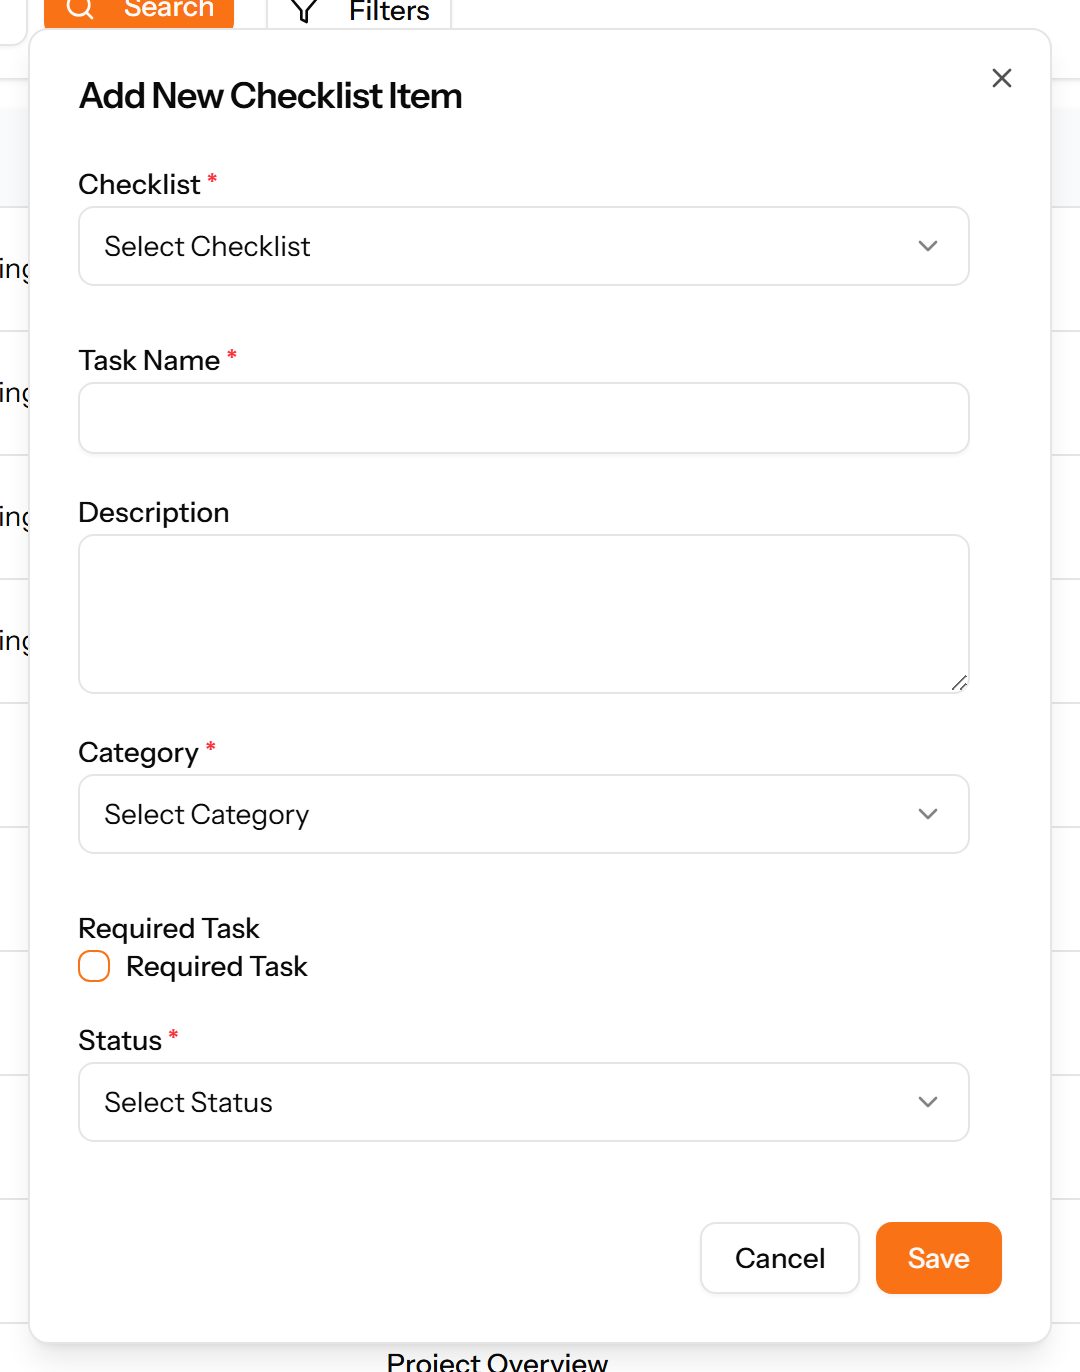
The Add Item form
The Add Item form

Candidate Onboarding

Progress through onboarding for a specific new joiner, including the buddy assigned to them.
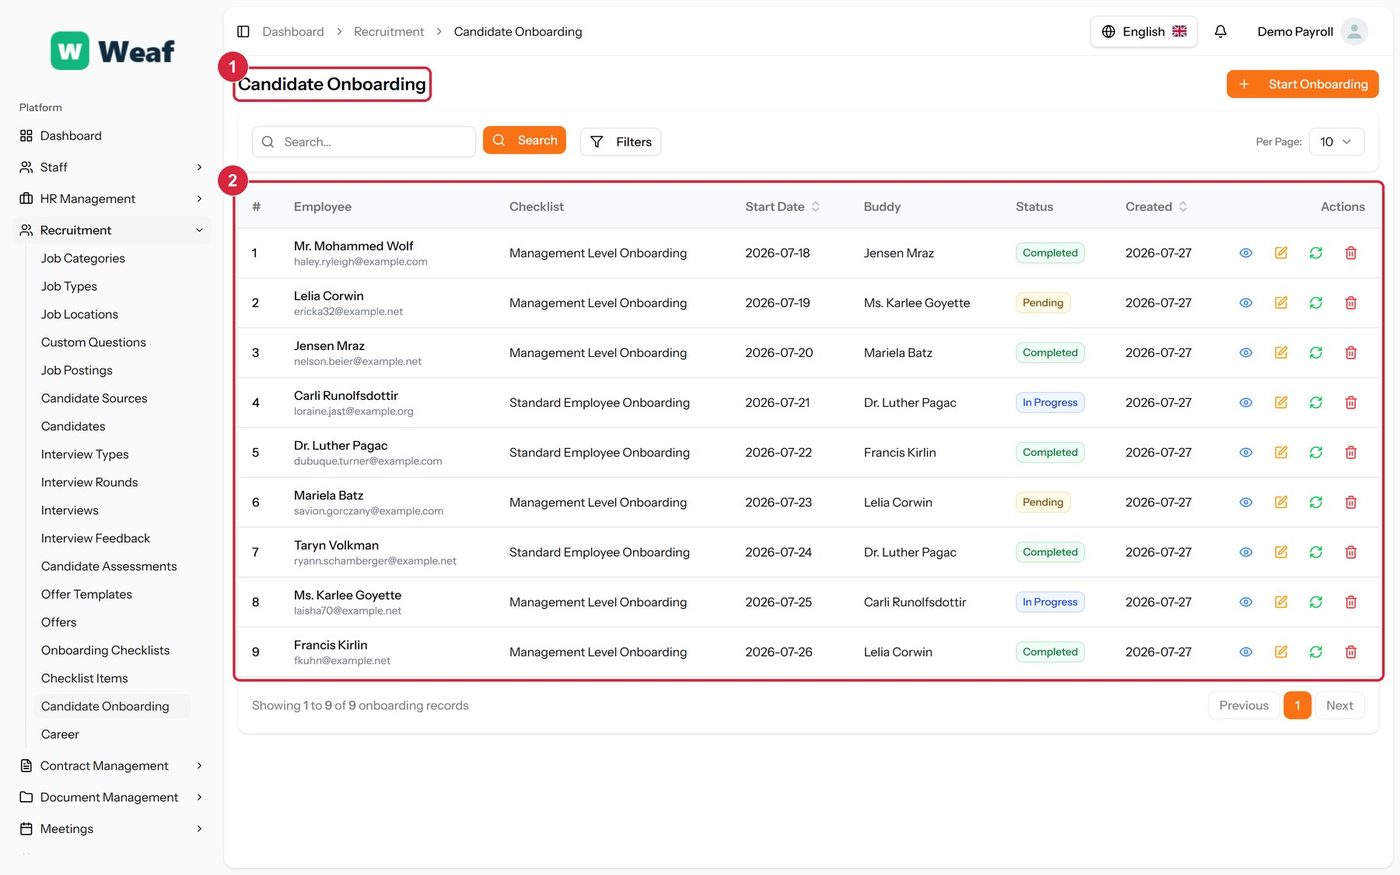
The Candidate Onboarding page
  • 1 page title
  • 2 records table
Columns
  • #
  • Employee
  • Checklist
  • Start Date
  • Buddy
  • Status
  • Created
  • Actions
Actions on this page
  • Start Onboarding

Common questions about recruitment and onboarding

How do I add a job category in Weaf HR?

A reference list. Entries created here become the options offered when you create a job posting. Setting these up once, before the records that use them, saves correcting the same choice repeatedly later.

  1. Choose Add Job Category at the top right. The form opens in a panel.
  2. Complete the required fields: Name.
  3. Fill in anything else that applies: Description.
  4. Make the selections the form asks for: Status.
  5. Choose Save. The new record appears in the list.
How do I add a job type in Weaf HR?

A reference list. Entries created here become the options offered when you create a job posting. Setting these up once, before the records that use them, saves correcting the same choice repeatedly later.

  1. Choose Add Job Type at the top right. The form opens in a panel.
  2. Complete the required fields: Name.
  3. Fill in anything else that applies: Description.
  4. Make the selections the form asks for: Status.
  5. Choose Save. The new record appears in the list.
How do I add a job location in Weaf HR?

Where a job is based. Locations are reusable across postings and carry an address and a type, such as on-site or remote.

  1. Choose Add Job Location at the top right. The form opens in a panel.
  2. Complete the required fields: Name.
  3. Fill in anything else that applies: Remote Work, Address, City, State, Country, Postal Code.
  4. Make the selections the form asks for: Status.
  5. Choose Save. The new record appears in the list.
How do I add a custom question in Weaf HR?

Extra questions added to the application form, for information a CV does not reliably provide.

  1. Choose Add Custom Question at the top right. The form opens in a panel.
  2. Complete the required fields: Question.
  3. Choose Save. The new record appears in the list.
How do I add a job posting in Weaf HR?

The vacancies themselves. A posting carries a code, a title, a type, a location and a salary range, and collects the applications made against it. Published postings appear on the public careers page.

  1. Choose Add Job Posting at the top right. The form opens on its own page.
  2. Complete the required fields: Job Title, Start Date, Application Deadline, Application URL, Number of Positions, Min Experience (Years), Max Experience (Years), Min Salary, Max Salary.
  3. Fill in anything else that applies: Type Required Skills and press Enter, Featured Job, Gender, Date Of Birth, Cover Letter, Terms And Conditions.
  4. Make the selections the form asks for: Job Type, Location, Branch, Department.
  5. Choose Save. The new record appears in the list.
How do I add a candidate source in Weaf HR?

A reference list. Entries created here become the options offered when you create a candidate, to record where they came from. Setting these up once, before the records that use them, saves correcting the same choice repeatedly later.

  1. Choose Add Candidate Source at the top right. The form opens in a panel.
  2. Complete the required fields: Name.
  3. Fill in anything else that applies: Description.
  4. Make the selections the form asks for: Status.
  5. Choose Save. The new record appears in the list.
How do I add an interview type in Weaf HR?

A reference list. Entries created here become the options offered when you create an interview. Setting these up once, before the records that use them, saves correcting the same choice repeatedly later.

  1. Choose Add Interview Type at the top right. The form opens in a panel.
  2. Complete the required fields: Name.
  3. Fill in anything else that applies: Description.
  4. Make the selections the form asks for: Status.
  5. Choose Save. The new record appears in the list.
How do I add an interview round in Weaf HR?

The stages a candidate passes through for a given job, in sequence — screening, technical, final. Defined per job so different roles can be hired differently.

  1. Choose Add Interview Round at the top right. The form opens in a panel.
  2. Complete the required fields: Name, Sequence Number.
  3. Fill in anything else that applies: Description.
  4. Make the selections the form asks for: Job, Status.
  5. Choose Save. The new record appears in the list.
How do I add interview feedback in Weaf HR?

What each interviewer thought, with an overall rating and a recommendation. Separating feedback from the interview itself allows several interviewers to report on the same conversation.

  1. Choose Add Feedback at the top right. The form opens in a panel.
  2. Fill in anything else that applies: Select Interviewer, Technical Rating (1-5), Communication Rating (1-5), Cultural Fit Rating (1-5), Overall Rating (1-5), Strengths, Weaknesses, Comments.
  3. Make the selections the form asks for: Interview, Recommendation.
  4. Choose Save. The new record appears in the list.
How do I add a candidate assessment in Weaf HR?

Tests or exercises set for a candidate, with the score achieved and who conducted it.

  1. Choose Add Assessment at the top right. The form opens in a panel.
  2. Complete the required fields: Assessment Name, Assessment Date.
  3. Fill in anything else that applies: Score, Max Score, Comments.
  4. Make the selections the form asks for: Candidate, Status, Employee.
  5. Choose Save. The new record appears in the list.
How do I add an offer template in Weaf HR?

Reusable offer letter wording with placeholders that are filled in for each candidate, so every offer is consistent.

  1. Choose Add Template at the top right. The form opens in a panel.
  2. Complete the required fields: Template Name, Template Content.
  3. Fill in anything else that applies: Variables.
  4. Make the selections the form asks for: Status.
  5. Choose Save. The new record appears in the list.
How do I create an offer in Weaf HR?

Offers made: the salary, the proposed start date, when the offer expires and whether it has been accepted.

  1. Choose Create Offer at the top right. The form opens in a panel.
  2. Complete the required fields: Salary, Start Date, Expiration Date.
  3. Fill in anything else that applies: Candidate, Position, Department, Benefits.
  4. Choose Save. The new record appears in the list.
How do I add an onboarding checklist in Weaf HR?

A named list of everything a new joiner must complete. Built once, then applied to each new starter.

  1. Choose Add Checklist at the top right. The form opens in a panel.
  2. Complete the required fields: Checklist Name.
  3. Fill in anything else that applies: Description, Set as Default.
  4. Make the selections the form asks for: Status.
  5. Choose Save. The new record appears in the list.
How do I add a checklist item in Weaf HR?

The individual tasks that make up the checklists, each belonging to a checklist and a category.

  1. Choose Add Item at the top right. The form opens in a panel.
  2. Complete the required fields: Task Name.
  3. Fill in anything else that applies: Description, Required Task.
  4. Make the selections the form asks for: Checklist, Category, Status.
  5. Choose Save. The new record appears in the list.

See all questions →